
Overview
CS ModBuddy is for those who prefer to use a desktop app for planning their modules. More importantly, CS ModBuddy is optimized for those who prefer to work with a Command Line Interface (CLI) while still having the benefits of a Graphical User Interface (GUI). The user interacts with it using a CLI, and it has a GUI created with JavaFX. It is written in Java, and has about 25 kLoC.
Summary of contributions
Overall contributions were in the field of User Interface and User Experience.
-
Major enhancement: added Autocomplete
-
What it does: When the user presses
tab, the command word, or module code, or semester, or tag name will be autocompleted. If there is only one possible completion, it will be filled immediately. If there is more than one possible completion, a menu of possible autocompletions is drawn that can be selected with the up and down buttons. -
Justification: This feature improves the product significantly because it makes the entire basis of the command-line interface, typing commands, significantly smoother and easier.
-
Highlights: This enhancement affects every part of the user experience in this CLI app. It is interlinked with existing commands and commands to be added in future. It required an in-depth analysis of design alternatives. The implementation too was challenging as it required some use of data structures, as well as integration with existing commands, module codes, and tags.
-
-
Minor enhancements:
-
Added expanding and collapsing of semesters, allows familiar semesters to take up less important visual space in the GUI.
-
Added various GUI themes, such as light or dark mode, so that the user can customise the look of the GUI to their wants.
-
Added a complex help function that can give general help and also specific help per command, which makes using the app much simpler.
-
Added block command handling for adding modules, so multiple modules can be added to a semester at once.
-
Handled most of the overall GUI design.
-
-
Code contributed: [Functional code] [Test code]
-
Other contributions:
-
Project management:
-
Team Lead.
-
-
Enhancements to existing features:
-
Documentation:
-
Edited UI section in Developer Guide.
-
Helped to rearrange sections within User Guide.
-
Wrote user stories and target user profile.
-
-
Community:
-
Reviewed other team’s Developer Guide: [MoneyGoWhere]
-
Contributed to forum: [library request]
-
-
Contributions to the User Guide
Given below are sections I contributed to the User Guide. They showcase my ability to write documentation targeting end-users. |
Basic
General Help: help
Provides a list of possible commands the user can type with brief descriptions.
Format: help
Help for a specific command: help
Provides detailed help for a specific command, including the parameters required.
Format: help COMMAND
Example:
-
help newplan
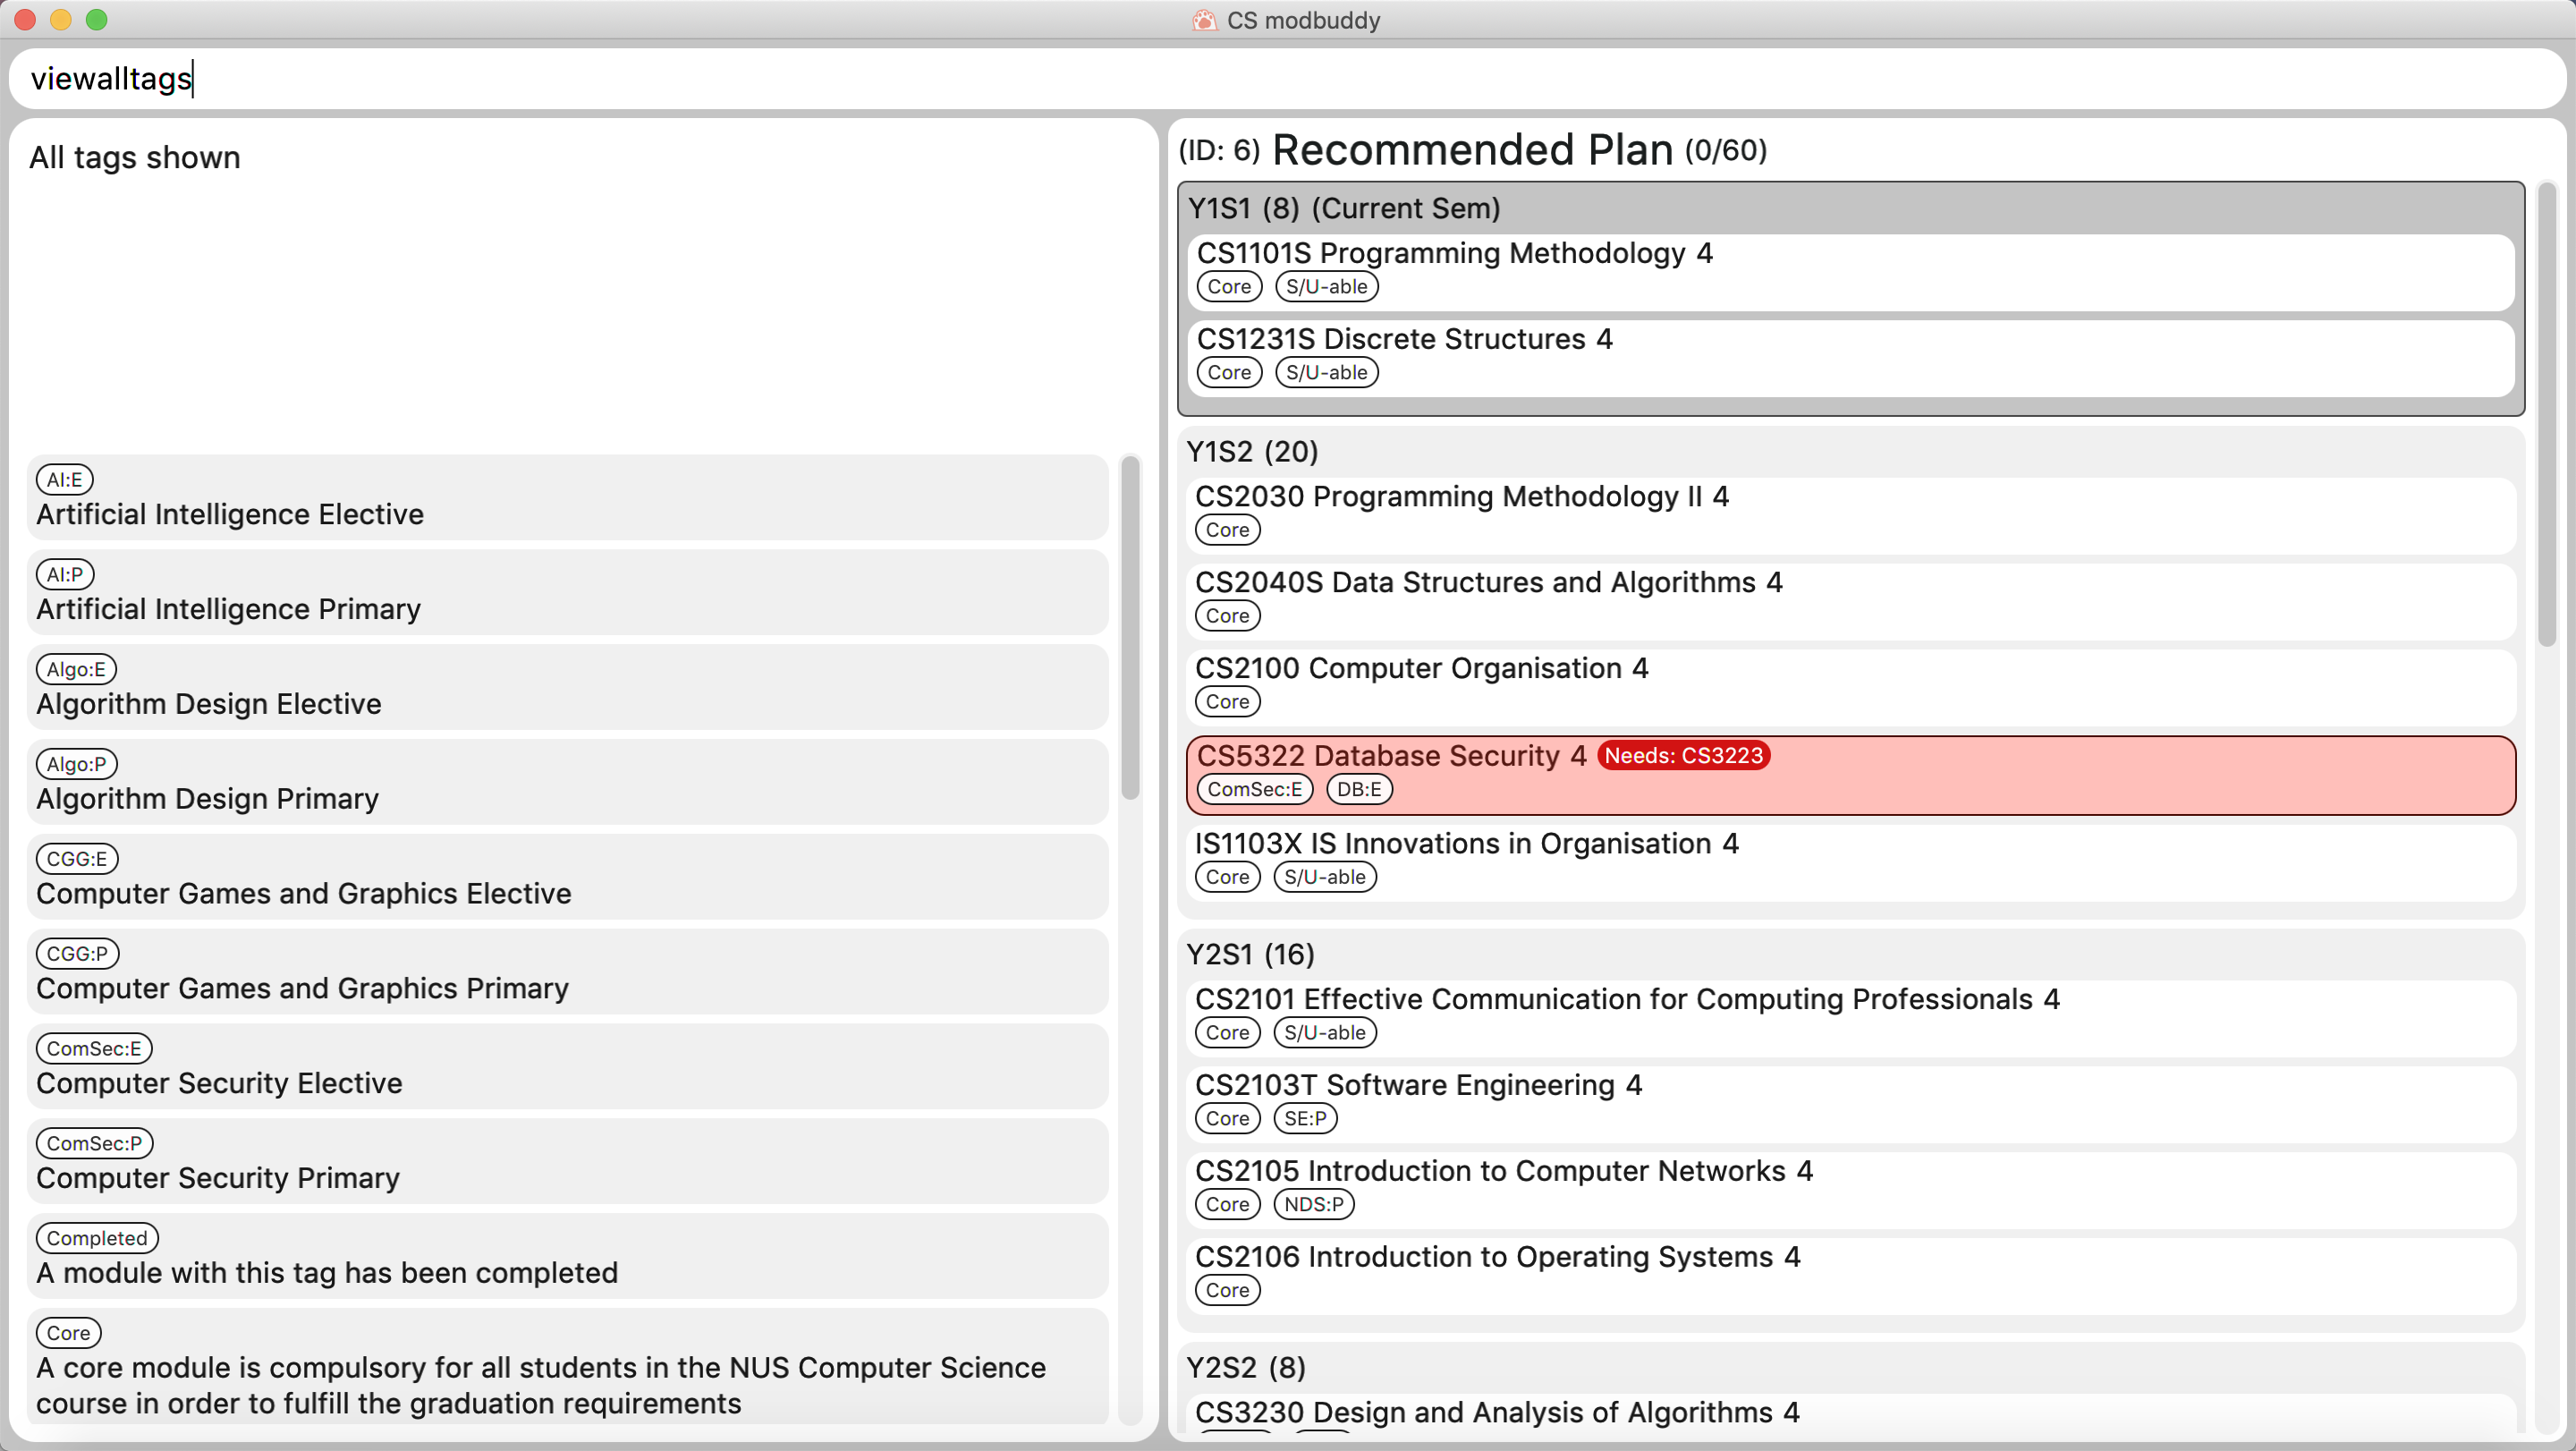
Autocompleting: tab
When the user presses tab, the command word, or module code, or semester,
or tag name will be autocompleted
If there is only one possible completion, it will be filled immediately.
If there is more than one possible completion, a menu of possible autocompletions
is drawn that can be selected with the up and down buttons.
GUI
Expanding a semester: expand
Expands a semester so that more details can be seen. Will display module titles, MC count, and their tags.
Format: expand SEMESTER
Example:
-
expand y1s1
Expanding all semesters: expandall
Expands all semesters so that more details can be seen. Will display module titles, MC count, and their tags.
Format: expandall
Collapsing a semester: collapse
Collapses a semester so that most details are hidden. Will hide module titles, MC count, and their tags.
Format: collapse SEMESTER
Example:
-
collapse y1s1
Collapsing all semesters: collapseall
Collapses all semesters so that most details are hidden. Will hide module titles, MC count, and their tags.
Format: collapseall
Changing the theme of the GUI: theme
Changes the theme of the GUI. Existing themes are: light, dark, hacker, dawn.
Format: theme THEME_NAME
Examples:
-
theme light -
theme dark -
theme hacker -
theme dawn
Upcoming Features [coming in v2.0]
GUI
Animations: [coming in v2.0]
Expanding and collapsing semesters will be fluidly animated.
Colours: [coming in v2.0]
Each module and tag can be assigned with a specific colour to allow more customisation.
Contributions to the Developer Guide
Given below are sections I contributed to the Developer Guide. They showcase my ability to write technical documentation and the technical depth of my contributions to the project. |
UI component
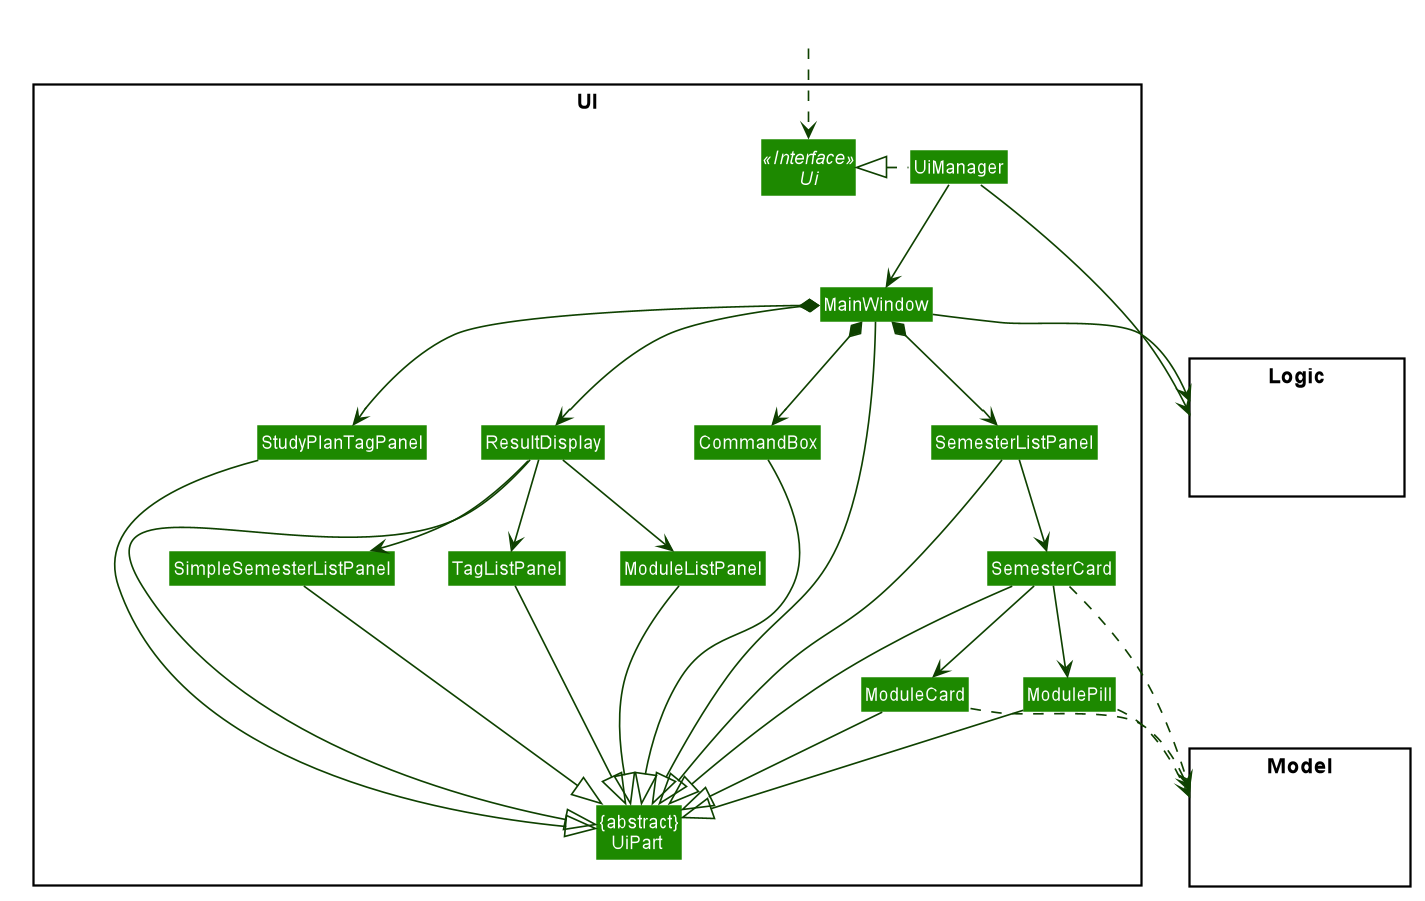
API : Ui.java
The UI consists of a MainWindow that is made up of parts e.g.
SemesterListPanel, ResultDisplay, CommandBox, StudyPlanTagPanel, etc.
All these, including the MainWindow, inherit from the abstract UiPart class.
The UI component uses JavaFx UI framework. The layout of these UI parts are defined in matching .fxml files that are in the src/main/resources/view folder. For example, the layout of the MainWindow is specified in MainWindow.fxml
The UI component,
-
Executes user commands using the
Logiccomponent. -
Listens for changes to
Modeldata so that the UI can be updated with the modified data.
Autocomplete
Implementation
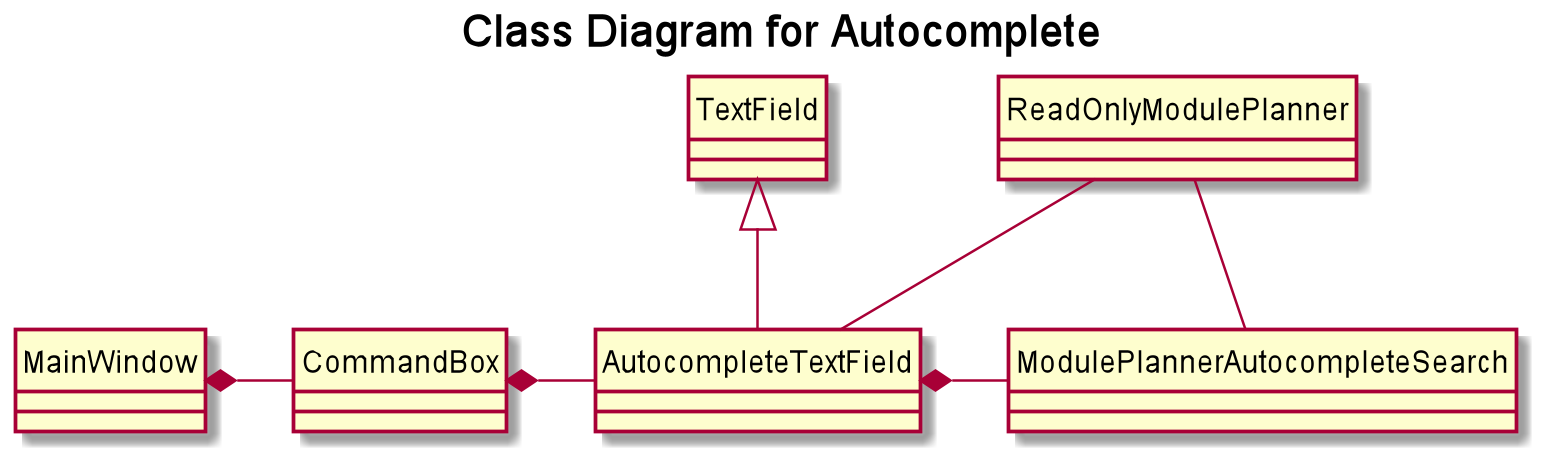
The autocompletion of keywords is facilitated by AutocompleteTextField, which inherits from Textfield,
and ModulePlannerAutocompleteSearch.
AutocompleteTextField handles user input and changing the text in the text field.
ModulePlannerAutocompleteSearch handles the autocorrect searching for keywords.
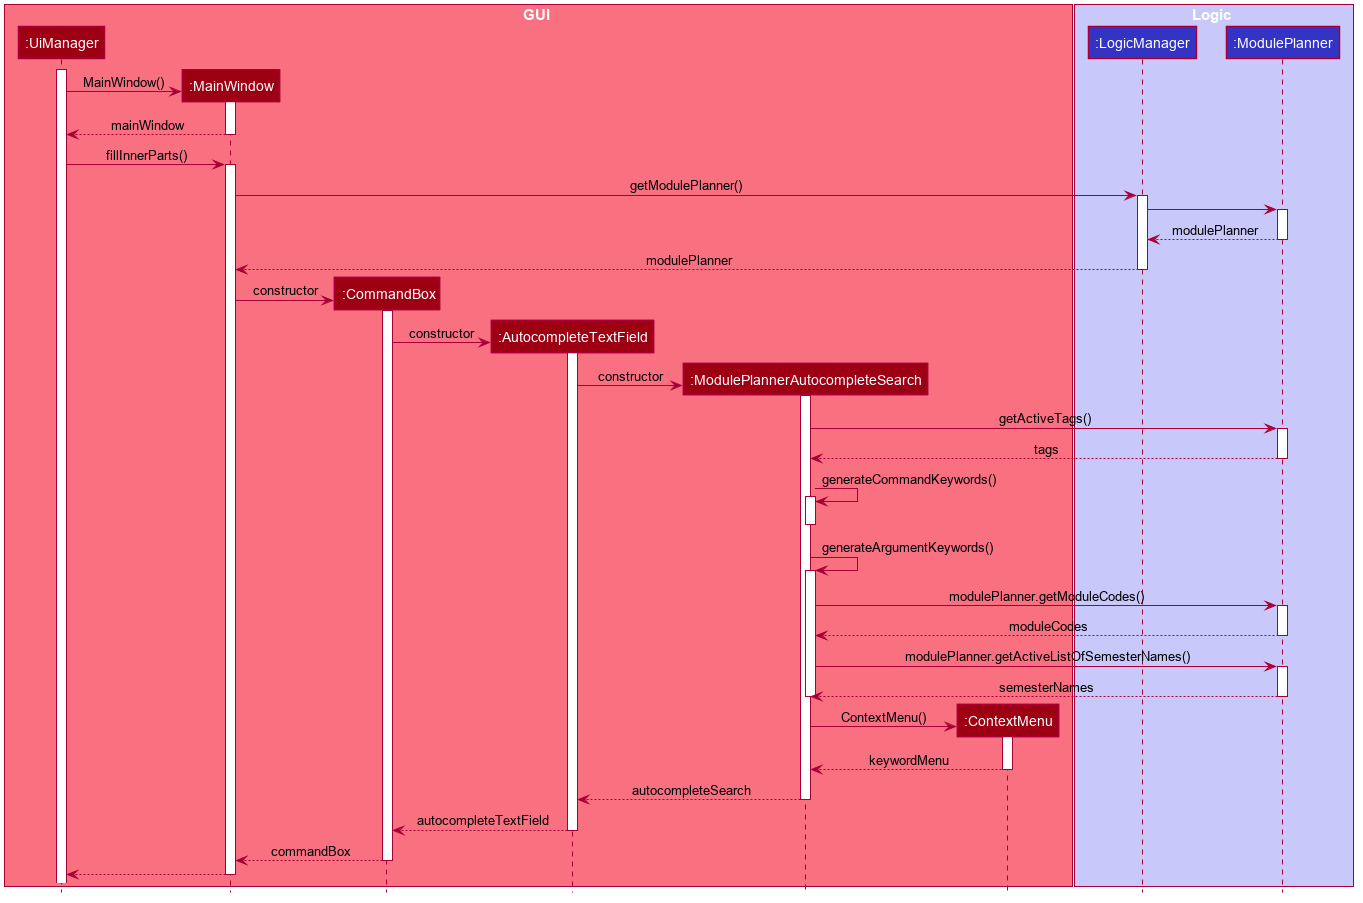
When the MainWindow is created, a CommandBox is created and added to the GUI.
The CommandBox creates an AutocompleteTextField and it is added to the GUI.
The AutocompleteTextField holds a ModulePlannerAutocompleteSearch.
CommandBox attaches a keyEvent listener to AutocompleteTextField that listens for the TAB key press,
which starts the autocomplete process.
ModulePlannerAutocompleteSearch holds two sets of keywords, a set for commands and a set for arguments.
These keywords are represented as SortedSet<String>.
Within each input, the first word will be autocompleted with the set for commands,
while subsequent words (separated by spaces) will be autocompleted with the set for arguments.
An exception is the help command, in which the subsequent words will be autocompleted with the
set for commands.
ModulePlannerAutocompleteSearch is constructed with a ReadOnlyModulePlanner.
It is used to create the keyword sets.
Hence, AutocompleteTextField is also constructed with a ReadOnlyModulePlanner to pass this down.
The following sequence diagram shows the creation of Autocomplete:
AutocompleteTextField holds the following public operations:
-
AutocompleteTextField#handleAutocomplete— Handles the entire autocomplete process based on the current text. -
AutocompleteTextField#handleChangeOfActiveStudyPlan— Resets the argument keywords when there is a change in the active study plan.
ModulePlannerAutocompleteSearch is never accessed by any external classes.
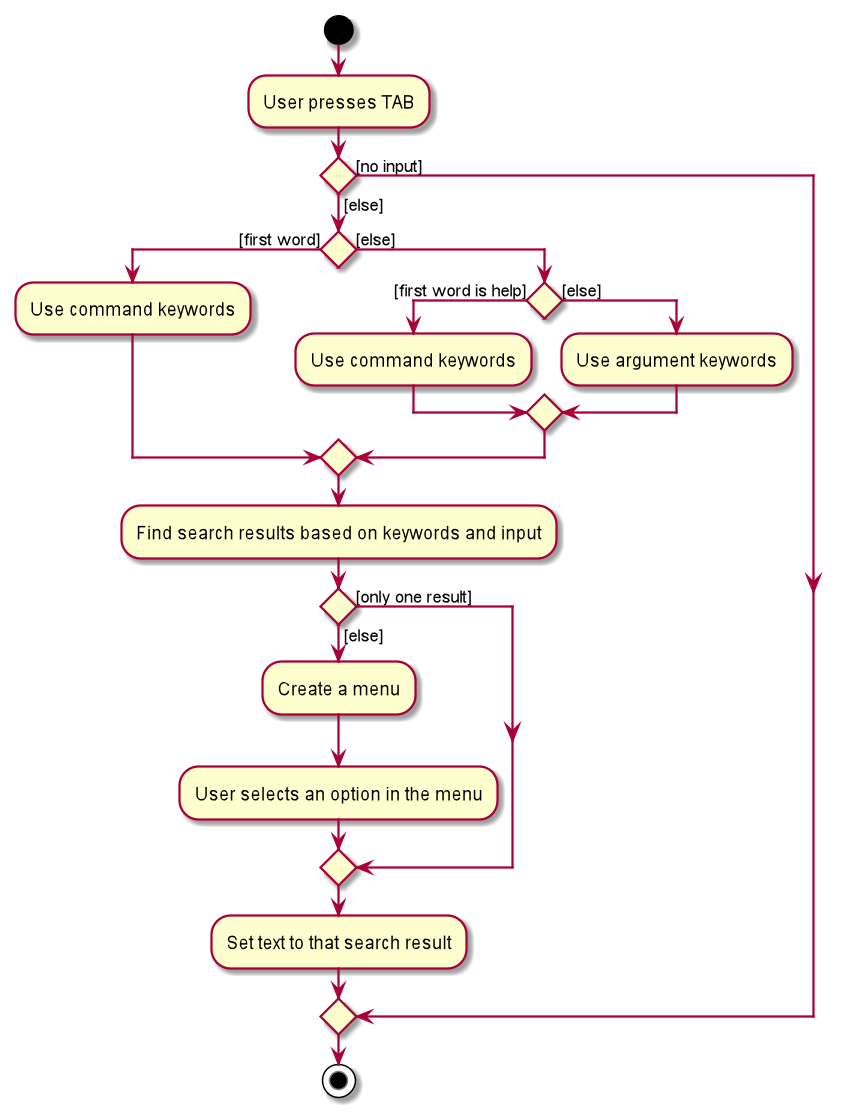
Given below is an example usage scenario of the AutocompleteTextField#handleAutocomplete() operation
and how the autocomplete mechanism behaves at each step for commands.
Step 1. The user enters the beginning of a command into the GUI text field, for example "addt" for addtag.
The user then presses the activation key TAB with begins the autocomplete process.
The KeyEvent listener calls the AutocompleteTextField#handleAutocomplete() operation.
Step 2: AutocompleteTextField passes the input to ModulePlannerAutocompleteSearch, by calling
ModulePlannerAutocompleteSearch#getSearchResults(String input).
In ModulePlannerAutocompleteSearch, the text in the text field is checked.
As it is the first word, the keywords set for commands is used.
ModulePlannerAutocompleteSearch#performSearch(String input, SortedSet<String> keywords)
is called to proceed with the search.
Step 3: This method finds search results, which is a subset from the keywords set for commands that begin with the input.
This result is returned back through ModulePlannerAutocompleteSearch#getSearchResults(String input).
AutocompleteTextField#handleAutocomplete() uses the search results to proceed.
There are two possible scenarios that are described in Steps 4 and 5.
Step 4: If there is only one search result,
AutocompleteTextField#setAutocompleteText(String searchResult) is called. Proceed to Step 6.
Step 5: If there is more than one search result, a menu will be created for the user to make a selection.
This method will call the populateMenu(List<String> searchResult) method, and then show the menu if it is not showing.
Then, focus will be requested from the first menu item in the menu. The populateMenu(List<String> searchResult)
populates a ContextMenu with CustomMenuItem, which correspond to each search result.
On action of the menu item, either through clicking or pressing the key ENTER while it is focused,
AutocompleteTextField#setAutocompleteText(String searchResult) is called. Proceed to Step 6.
Step 6: AutocompleteTextField#setAutocompleteText(String searchResult)
causes the input text to be changed to the search result and the caret
positioned at the end of the line.
The autocomplete mechanism behaves similarly for arguments, except the argument set of keywords will be used.
Furthermore, AutocompleteTextField#setAutocompleteText(String searchResult) will cause
the input text to be changed to the text before the space concatenated with a space and the search result
and the caret is positioned at the end of the line.
This change replicates autocompleting only the last word without erasing previous terms.
The following activity diagram shows how the autocomplete works:
Design Considerations
Aspect: How autocompletion is broken down
-
Alternative 1 (current choice): One class for handling the text field, one class for handling the querying.
-
Pros: Easier for testing. More cohesion.
-
Cons: More classes written.
-
-
Alternative 2 : One class to handle everything.
-
Pros: Easier to code.
-
Cons: Harder to test.
-
Aspect: How arguments are completed
-
Alternative 1 (current choice): All arguments including semester names, tags and module codes are checked for together.
-
Pros: Easy to implement.
-
Cons: User may want to only be autocompleting for tags, but module codes appear as well.
-
-
Alternative 2: Arguments are identified as tags or module codes and autocompleted based on the command.
-
Pros: User can autocomplete without undesired suggestions.
-
Cons: The command will have to be parsed upon autocomplete call, which will take more time and alter the structure of parsing commands.
-
Aspect: How help is implemented
-
Alternative 1 (current choice): Help is treated as a special case.
-
Pros: Easy to implement. Help is the only command that takes in commands as arguments.
-
Cons: A hard-coded exception does not make the code extensible.
-
-
Alternative 2: Every command is parsed and their keywords identified.
-
Pros: More extensible as help is future commands can take in commands as keywords.
-
Cons: The command will have to be parsed upon autocomplete call, which will take more time and alter the structure of parsing commands.
-
Use case: UC02 - Add module
MSS
-
Student requests to add a module to a particular semester.
-
ModBuddy displays changes to study plan.
Use case ends.
Extensions
-
1a. ModBuddy detects that the module entered does not exist.
-
1a1. ModBuddy prompts Student to enter a correct module code
-
1a2. User enters new module.
Steps 1a1-1a2 are repeated until the data entered are correct.
Use case ends.
-