
By: Team CS2103-F09-3 Since: Sep 2019 Licence: MIT
- 1. Setting up
- 2. Design
- 3. Implementation
- 4. Documentation
- 5. Testing
- 6. Dev Ops
- Appendix A: Product Scope
- Appendix B: User Stories
- Appendix C: Use Cases
- Appendix D: Non Functional Requirements
- Appendix E: Glossary
- Appendix F: Instructions for Manual Testing
- F.1. Launch and Shutdown
- F.2. Executing basic commands
- F.3. Executing module-related commands
- F.4. Executing semester-related commands
- F.5. Executing tagging-related commands
- F.6. Executing study plan-level commands
- F.7. Executing version tracking-related commands
- F.8. Executing information and verification-related commands
- F.9. Executing GUI-related commands
1. Setting up
Refer to the guide here.
2. Design
2.1. Architecture
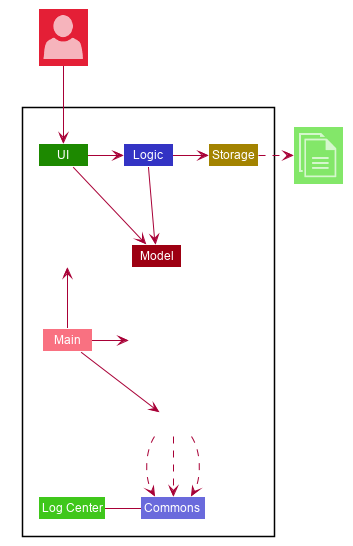
The Architecture Diagram given above explains the high-level design of the App. Given below is a quick overview of each component.
-
At app launch: Initializes the components in the correct sequence, and connects them up with each other.
-
At shut down: Shuts down the components and invokes cleanup method where necessary.
Commons represents a collection of classes used by multiple other components.
The following class plays an important role at the architecture level:
-
LogsCenter: Used by many classes to write log messages to the App’s log file.
The rest of the App consists of four components.
Each of the four components
-
Defines its API in an
interfacewith the same name as the Component. -
Exposes its functionality using a
{Component Name}Managerclass.
For example, the Logic component (see the class diagram given below) defines its API in the Logic.java interface and exposes its functionality using the LogicManager.java class.

How the architecture components interact with each other
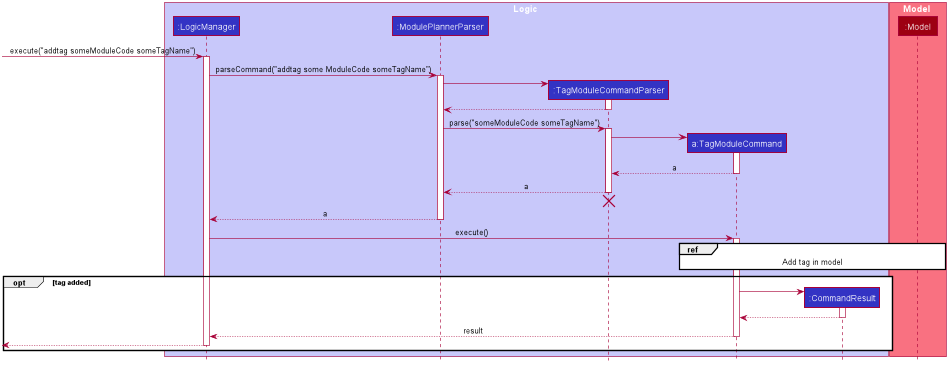
The Sequence Diagram below shows how the components interact with each other for the scenario where the user issues
the command addmod y1s1 CS3244.
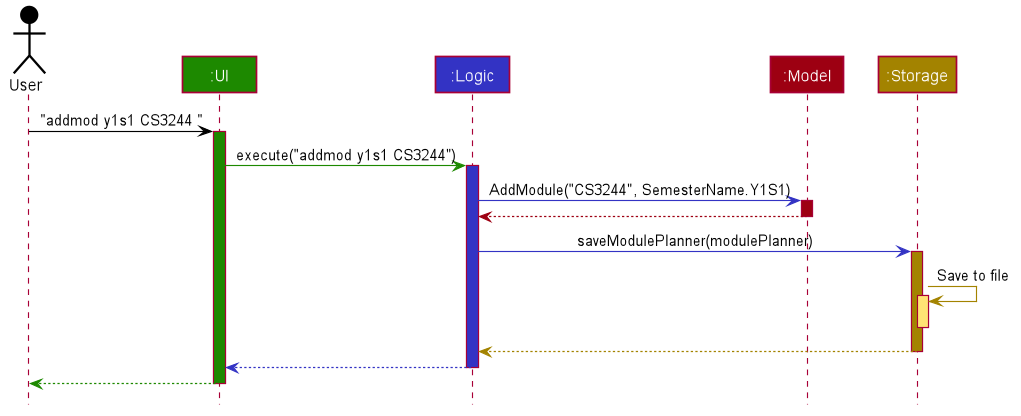
addmod y1s1 CS3244 commandThe sections below give more details of each component.
2.2. UI component
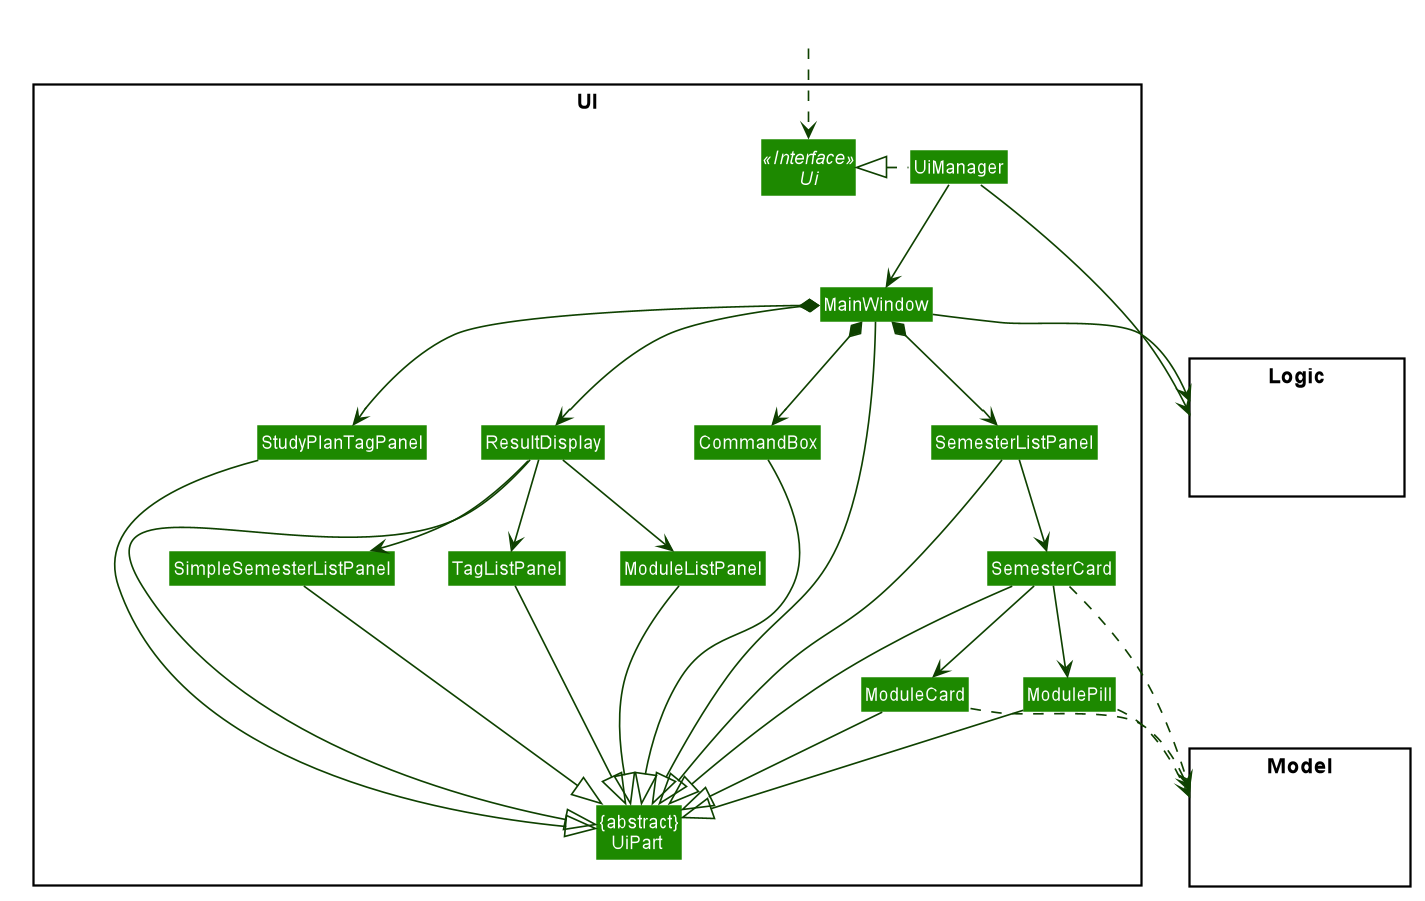
API : Ui.java
The UI consists of a MainWindow that is made up of parts e.g.
SemesterListPanel, ResultDisplay, CommandBox, StudyPlanTagPanel, etc.
All these, including the MainWindow, inherit from the abstract UiPart class.
The UI component uses JavaFx UI framework. The layout of these UI parts are defined in matching .fxml files that are in the src/main/resources/view folder. For example, the layout of the MainWindow is specified in MainWindow.fxml
The UI component,
-
Executes user commands using the
Logiccomponent. -
Listens for changes to
Modeldata so that the UI can be updated with the modified data.
2.3. Logic component
API :
Logic.java
-
Logicuses themodulePlannerParserclass to parse the user command. -
This results in a
Commandobject which is executed by theLogicManager. -
The command execution can affect the
Model(e.g. adding a module). -
The result of the command execution is encapsulated as a
CommandResultobject which is passed back to theUi. -
In addition, the
CommandResultobject can also instruct theUito perform certain actions, such as displaying information to the user or refreshing the Ui.
2.4. Model component
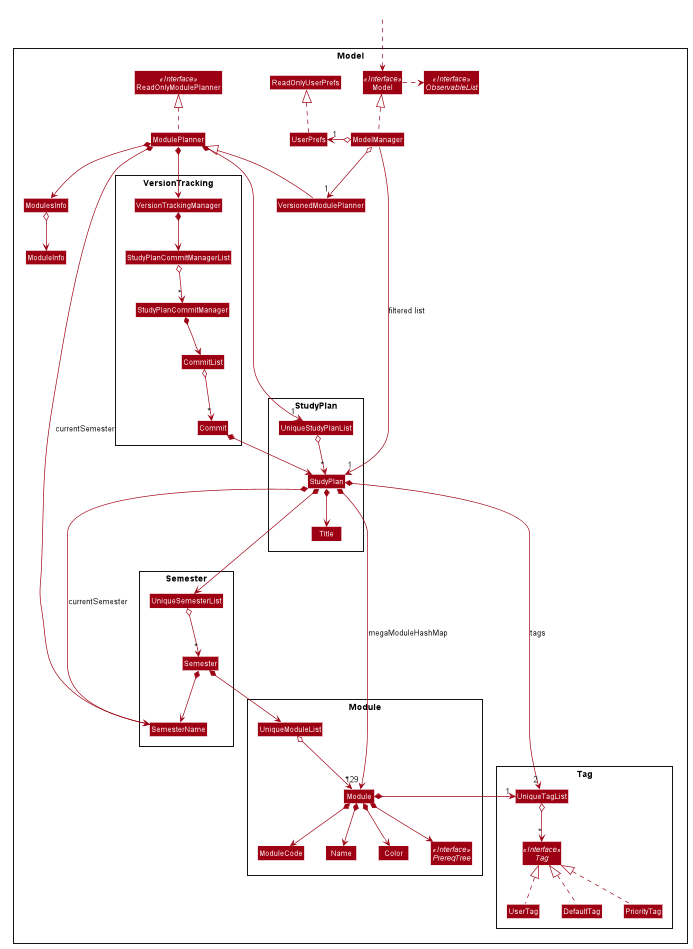
API : Model.java
The Model,
-
stores a
UserPrefobject that represents the user’s preferences. -
stores the data in the module planner, which consists of module information, study plans, semesters, modules, tags and version tracking history.
-
exposes an unmodifiable
ObservableList<StudyPlan>that can be 'observed' e.g. the UI can be bound to this list so that the UI automatically updates when the data in the list change. -
does not depend on any of the other three components.
2.5. Storage component
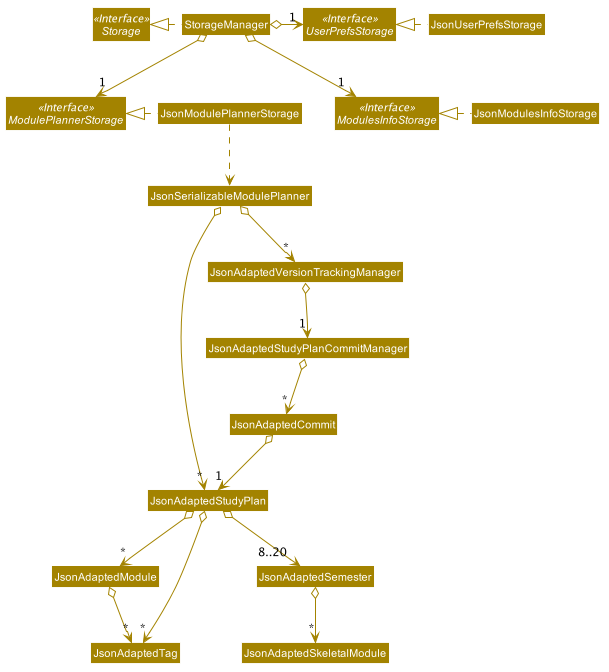
API : Storage.java
The Storage component,
-
can save
UserPrefobjects in json format and read it back. -
can save the
ModulePlannerdata in json format and read it back. -
can save the
ModulesInfodata in json format and read it back.
2.6. Common classes
Classes used by multiple components are in the seedu.address.commons package.
3. Implementation
This section describes some noteworthy details on how certain features are implemented.
3.1. Undo/Redo feature
3.1.1. Current Implementation
The undo/redo mechanism is inpired by the undo/redo implementation in AddressBook 3 and is facilitated by VersionedModulePlanner.
It extends modulePlanner with an undo/redo history, stored internally as an historyStateList and currentStatePointer.
Additionally, it implements the following operations:
-
VersionedModulePlanner#commit()— Saves the current module planner state in its history. -
VersionedModulePlanner#undo()— Restores the previous module planner state from its history. -
VersionedModulePlanner#redo()— Restores a previously undone module planner state from its history.
These operations are exposed in the Model interface as Model#addToHistory(), Model#undo() and Model#redo() respectively.
| Currently, the undo-redo mechanism does not include/respond to changes to commands involving Commits - saving and removing changes to the storage files. |
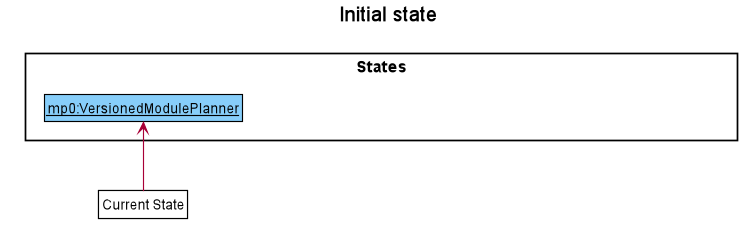
Given below is an example usage scenario and how the undo/redo mechanism behaves at each step.
Step 1. The user launches the application for the first time. The VersionedModulePlanner will be initialized with the initial module planner state, and the currentStatePointer pointing to that single module planner state.
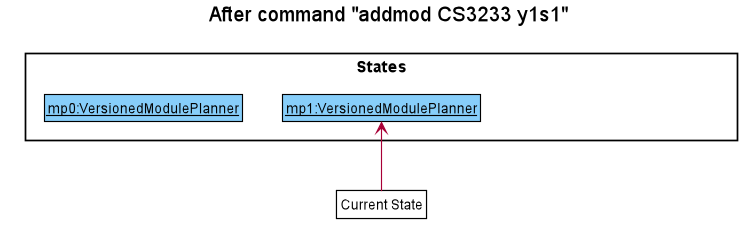
Step 2. The user executes addmod CS3233 y1s1 command to add the Module CS3233 module into Semester y1s1 in the active study plan. The addmod command calls Model#addToHistory(), causing the modified state of the module planner after the addmod CS3233 y1s1 command executes to be saved in the historyStateList, and the currentStatePointer is shifted to the newly inserted module planner state.
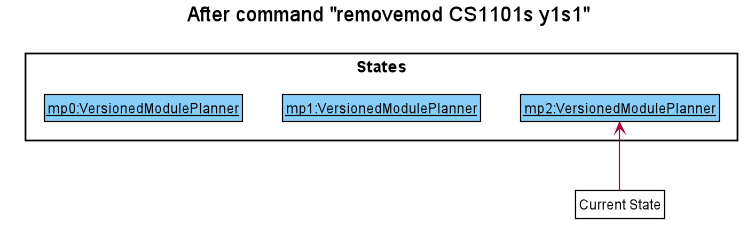
Step 3. The user executes removemod CS1101s y1s1 to remove the Module CS1101S module from Semester y1s1 in the active study plan. The remove command also calls Model#addToHistory(), causing another modified module planner state to be saved into the historyStateList.
If a command fails its execution, it will not call Model#addToHistory(), so the module planner state will not be saved into the historyStateList.
|
Step 4. The user now decides that removing the module was a mistake, and decides to undo that action by executing the undo command. The undo command will call Model#undo(), which will shift the currentStatePointer once to the left, pointing it to the previous module planner state, and restores the module planner to that state.
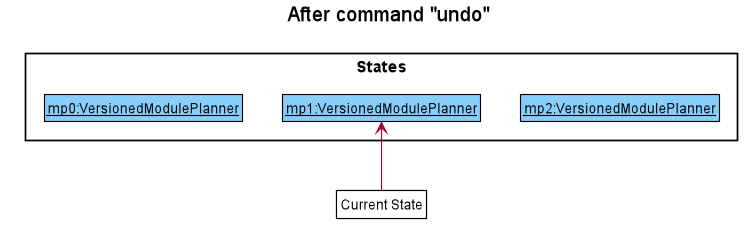
If the currentStatePointer is at index 0, pointing to the initial module planner state, then there are no previous module planner states to restore. The undo command uses Model#canUndo() to check if this is the case. If so, it will return an error to the user rather than attempting to perform the undo.
|
The following sequence diagram shows how the undo operation works:
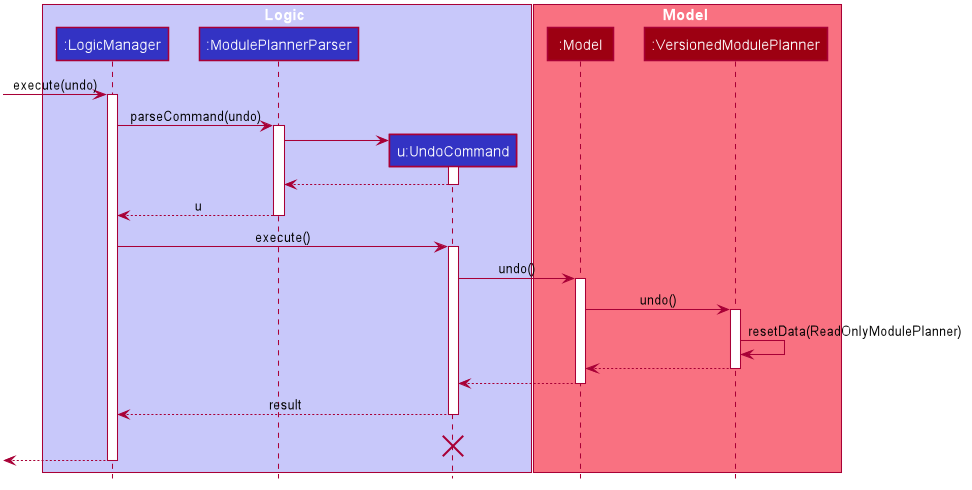
The lifeline for UndoCommand should end at the destroy marker (X) but due to a limitation of PlantUML, the lifeline reaches the end of diagram.
|
The redo command does the opposite — it calls Model#redo(), which shifts the currentStatePointer once to the right, pointing to the previously undone state, and restores the module planner to that state.
If the currentStatePointer is at index historyStateList.size() - 1, pointing to the latest module planner state, then there are no undone module planner states to restore. The redo command uses Model#canRedo() to check if this is the case. If so, it will return an error to the user rather than attempting to perform the redo.
|
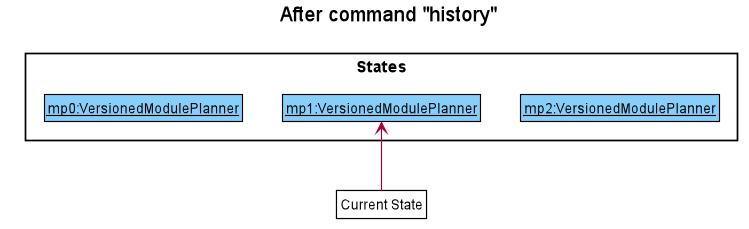
Step 5. The user then decides to execute the command history. Commands that do not modify the module planner, such as history, will usually not call Model#addToHistory(), Model#undo() or Model#redo(). Thus, the historyStateList remains unchanged.
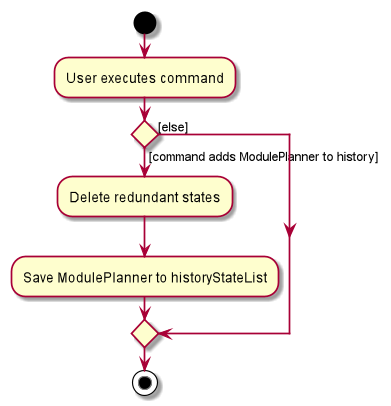
The following activity diagram summarizes what happens when a user executes a new command:
3.1.2. Design Considerations
Aspect: How undo & redo executes
-
Alternative 1 (current choice): Saves a copy of the entire module planner in the
historyStateList. It does this by performing a clone operation through the hierachy of classes of the ModulePlanner, from StudyPlan, Semester, Module down to Tag.-
Pros: Easier to implement.
-
Cons: May have performance issues in terms of memory usage. Need to take note of the implications of cloning all the objects.
-
-
Alternative 2: Implement redo/undo for every single command.
-
Pros: Will use less memory (e.g. for
removemod, just save the module being deleted). -
Cons: Tedious because there are a lot of commands and we must ensure that the implementation of each individual command are correct.
-
3.2. Parser
3.2.1. Current Implementation
The current parsing mechanism is facilitated by ArgumentTokenizer and ArgumentMultimap.
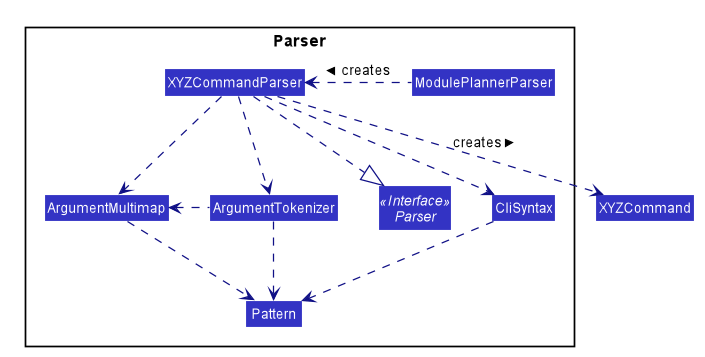
Given below is an example usage scenario and how the parsing mechanism behaves at each step.
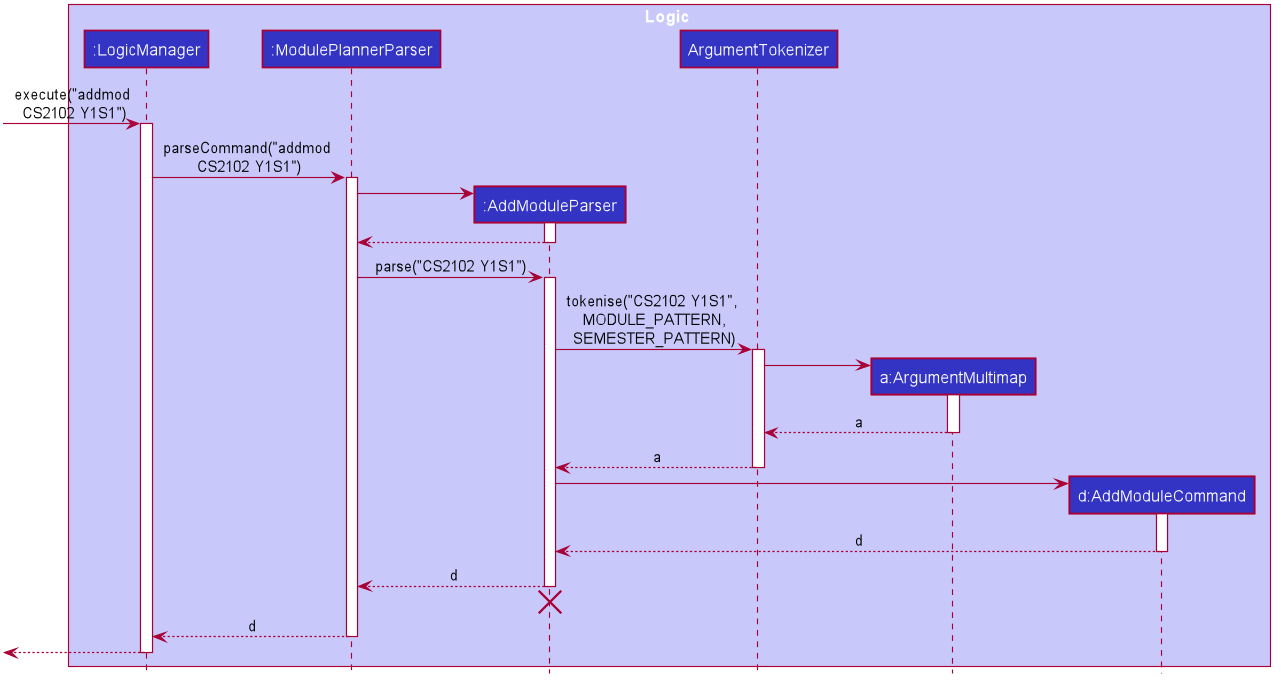
Step 1. The user enters the addmod MODULE_CODE SEMESTER. command to add a module with the moduel code MODULE_CODE to the
semester with the name SEMESTER. In this case, the command entered is addmod CS2102 Y1S1.
Step 2. The Ui component sends the command to the LogicManager to parse the command. The ModulePlannerParser detects the COMMAND_WORD of the command, addmod, and creates an instance of the AddModuleParser class.
Step 3. The AddModuleParser instance then calls ArgumentTokeniser static method, tokenise, with arguments ARG_STRING, MODULE_PATTERN and SEMESTER_PATTERN. These patterns are instances of Java Patterns class and are pre-defined in the CliSyntax class. They are passed into the tokenise method so that the ArgumentTokeniser knows to parse to find these patterns.
Step 4. The ArgumentTokeniser then creates an ArgumentMultiMap based on the specified patterns, which is then returned to the AddModuleParser.
Step 5. The ArgumentMultiMap is then used to obtain the arguments to create an instance of the AddModuleCommand class.
3.2.2. Design Considerations
Aspect: How parser is implemented
-
Alternative 1 (current choice): Use Java
Patternclass to detect argument types.-
Pros: User no longer has to type prefixes before each argument type to declare the parameter of the argument.
-
Cons: Difficult to implement because it requires a lot of corner case detection, and also does not consider the order of arguments being entered.
-
-
Alternative 2: Use prefixes (similar to that implemented in Address Book 3) so that user declares type of parameter before each argument in the command.
-
Pros: Easy to implement.
-
Cons: User has to type in prefixes, which will reduce ease and efficiency of application use.
-
3.3. Version Tracking
3.3.1. Current Implementation
The version tracking mechanism (or commit mechanism) is facilitated by VersionTrackingManager.
It is stored as an instance attribute of a ModulePlanner object.
Additionally, it implements the following operations:
-
VersionTrackingManager#getStudyPlanCommitManagerByStudyPlan(StudyPlan studyPlan)— Returns theStudyPlanCommitManagerfor the specified study plan. -
VersionTrackingManager#commitStudyPlan(StudyPlan studyPlan, String commitMessage)— Saves the current state of the study plan in its history stored in its correspondingStudyPlanCommitManager, together with a commit message. -
VersionTrackingManager#deleteStudyPlanCommitManagerByIndex(int index)— Deletes aStudyPlanCommitManagerspecified by the index of its corresponding study plan.
These operations are exposed in the Model interface as Model#commitActiveStudyPlan(String commitMessage),
Model#deleteStudyPlanCommitManagerByIndex(int index) etc.
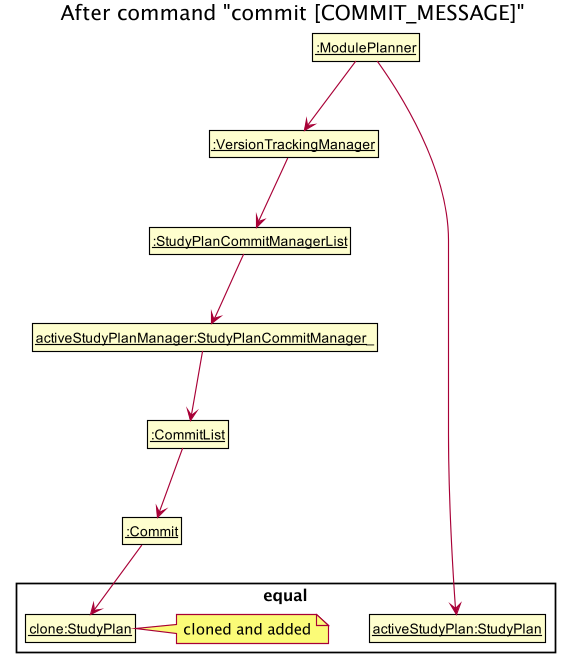
Given below is an example usage scenario and how the commit mechanism behaves at each step.
Step 1. The user launches the application for the first time. The VersionTrackingManager will be initialized with the
initial module planner state, and its StudyPlanCommitManagerList will only contain a manager for the default study plan.
Step 2. After changing the state of the current active study plan (e.g. by calling addmod cs1101s y1s1),
the user executes commit first draft command to save the current state of this study plan with the commit message
first draft. The commit command calls Model#commitActiveStudyPlan(String commitMessage),
causing the modified state of the current active study plan after the execution of the commit first draft command to be cloned and saved
in the StudyPlanCommitManager corresponding to this study plan, inside the VersionTrackingManager under
ModulePlanner.
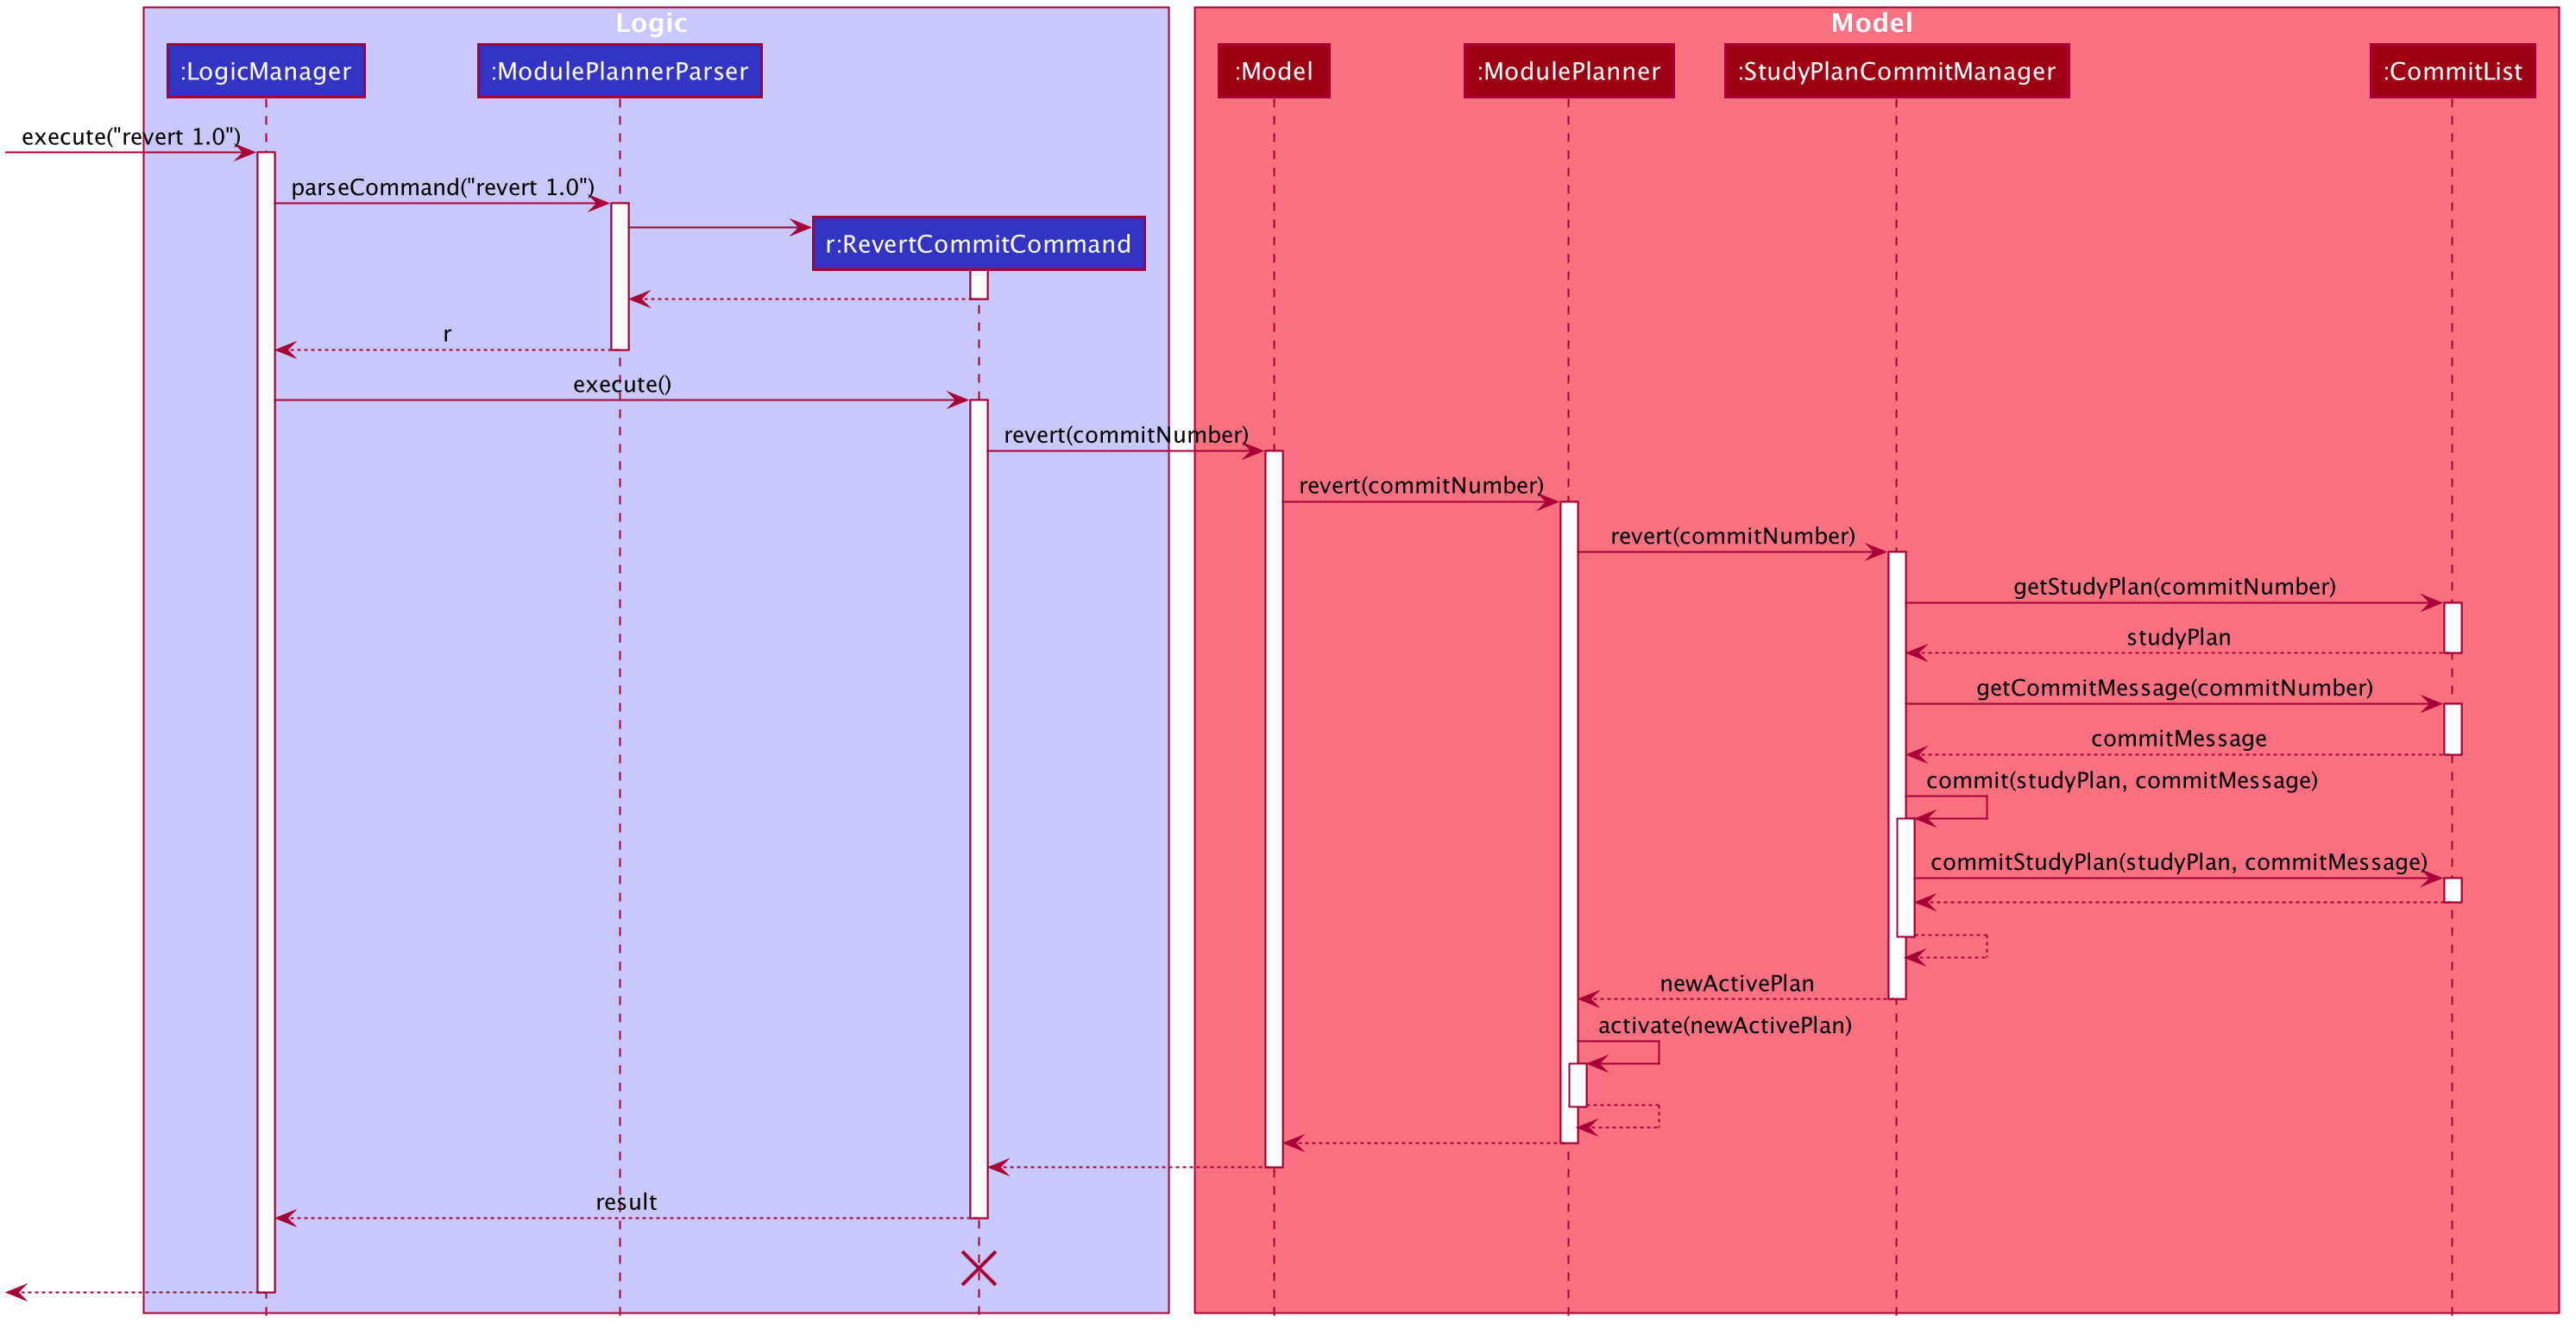
Step 3. The user executes revert 1.0 to revert to the commit indexed by 0 in the active study plan which
has an ID of 1. The revert command also calls Model#revertCommit(int studyPlanIndex, int commitNumber),
causing the state of the study plan stored in this commit to be made active, and this reverted state to be saved
into the StudyPlanCommitManager inside the VersionTrackingManager as a revert commit.
(simplified diagram to reduce clutter; revertToCommit is abbreviated as revert etc.)
If a study plan does not have any commit history, it will not call Model#revertCommit(int studyPlanIndex, int commitNumber),
so that no commit will be made active. Instead it will prompt the user to create commits first.
|
Step 4. The user now decides that there is a commit that they want to delete from the history completely,
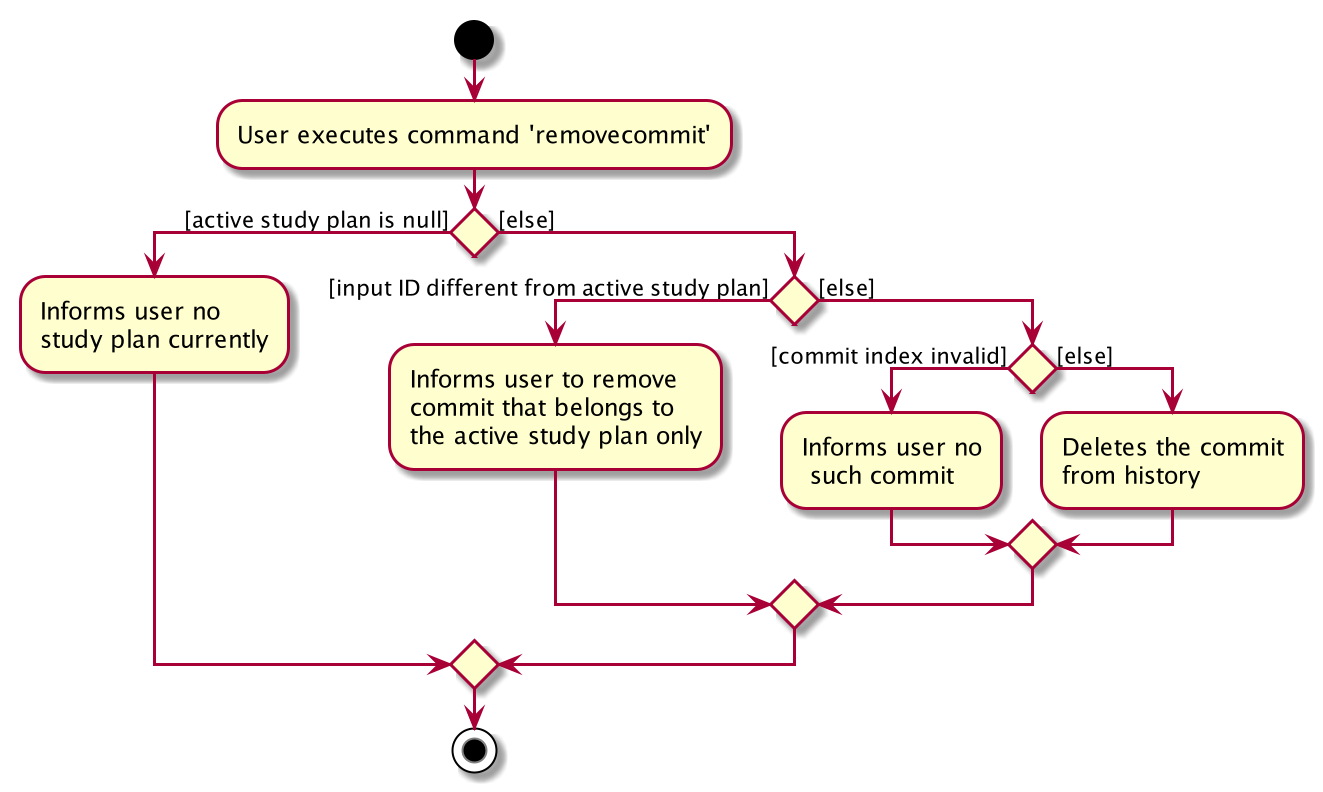
and decides to delete that commit by executing the removecommit command. The removecommit command
will call Model#deleteCommit(int studyPlanIndex, int commitNumber),
which will delete the commit specified by the commitNumber from the history of the study plan with ID studyPlanIndex.
| If the commit number entered does not refer to a valid commit (e.g. there is no commit at all or the index is out of bounds), no deletion will take place. Instead the user will be prompted by an error message. |
The following activity diagram shows how the removecommit operation works:
3.3.2. Design Considerations
Aspect: How commit executes
-
Alternative 1 (current choice): Saves the entire state of the study plan at the moment of commit.
-
Pros: Easy to implement.
-
Cons: May have performance issues in terms of memory usage.
-
-
Alternative 2: Only saves the difference of the current state from the state of the last commit.
-
Pros: Will use less memory (e.g. for
addmod, just store the module being added). -
Cons: We must ensure that the differences in states are stored and loaded correctly when we switch between commits.
-
Aspect: Data structure to support the commit commands
-
Current choice: Use a list to store the history of commits for each study plan.
-
Pros: Easy to implement. Each study plan has a clear history of its own.
-
Cons: Hard to handle the possibility of branching (which is currently disallowed).
-
3.4. Logging
We are using java.util.logging package for logging. The LogsCenter class is used to manage the logging levels and logging destinations.
-
The logging level can be controlled using the
logLevelsetting in the configuration file (See Section 3.5, “Configuration”) -
The
Loggerfor a class can be obtained usingLogsCenter.getLogger(Class)which will log messages according to the specified logging level -
Currently log messages are output through:
Consoleand to a.logfile.
Logging Levels
-
SEVERE: Critical problem detected which may possibly cause the termination of the application -
WARNING: Can continue, but with caution -
INFO: Information showing the noteworthy actions by the App -
FINE: Details that is not usually noteworthy but may be useful in debugging e.g. print the actual list instead of just its size
3.5. Configuration
Certain properties of the application can be controlled (e.g user prefs file location, logging level) through the configuration file (default: config.json).
3.6. Tagging Feature
3.6.1. Implementation
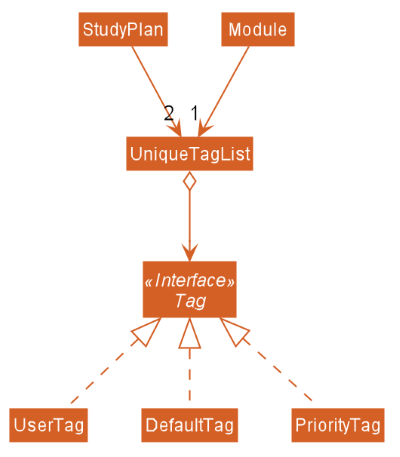
The tagging mechanism is facilitated by UserTag, DefaultTag, PriorityTag and UniqueTagList.
UserTag, DefaultTag and PriorityTag all implement the Tag interface.
Specifically, UserTag and DefaultTag are attached to modules and PriorityTag is attached to study plans.
Module Tags
UserTag represents user-created tags while the DefaultTag
represents default tags of one of the types in DefaultTagType. The key difference between UserTag and DefaultTag
is that the first is user-modifiable while the second is not and is essentially immutable. The operation
Tag#isDefault() is implemented to identify a Tag as a DefaultTag.
Study Plan Tags
PriorityTag represents a priority tag of one of the types in PriorityTagType. The user can attach a PriorityTag to a study plan to indicate its priority level.
The operation Tag#isPriority() is implemented to identify a Tag as a PriorityTag.
UniqueTagList
Each Tag is stored in a UniqueTagList, which implements Iterable<Tag> and is stored internally in Module and
StudyPlan. It represents a list of tags that can be of type UserTag, DefaultTag or PriorityTag and enforces the
uniqueness between them. Each StudyPlan has two unique tag lists, one for its PriorityTag and another for all of its modules' tags. The purpose
of storing the PriorityTag in a UniqueTagList instead of as independent attribute is to allow for further extensions
to study plan tagging, i.e. allowing study plans to have other kinds of tags.
UniqueTagList implements the following operations:
-
UniqueTagList#addTag(Tag toAdd)— Adds the givenTagto the list. -
UniqueTagList#removeTag(Tag toRemove)— Removes the givenTagfrom the list. -
UniqueTagList#containsTagWithName(String tagName)— Checks if the list contains aTagwith the giventagName. -
UniqueTagList#getTag(String tagName)— Returns theTagwith the giventagName.
There are many operations that can be done in relation to tagging modules. Some examples are adding, deleting,
and renaming tags. Given below is an example usage scenario of the UniqueTagList#addTag(Tag toAdd) operation and how the module tagging
mechanism behaves at each step.
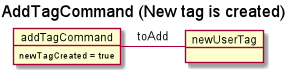
Step 1. The user executes the addtag MODULE_CODE TAG_NAME command to add a tag with the name TAG_NAME to the
module with the module code MODULE_CODE. A toAdd variable of type Tag and a boolean value newTagCreated is
maintained during the execution of the command to represent the tag that is to be added and whether or not a new tag
has been created respectively. The addtag command calls Model#activeSpContainsTag(String tagName) to check if the
active study plan contains a tag with the given tagName. This method accesses the active study plan in the module
planner and checks if such a tag exists in its UniqueTagList. There are two possible scenarios that are described
in steps 2 and 3.
Step 2. If such a tag does not exist, a new UserTag is created and is assigned to toAdd.
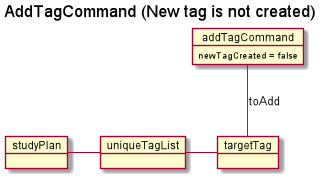
Step 3. If such a tag exists, Model#getTagFromActiveSp(String tagName) is called. The Tag in the UniqueTagList
of the active study plan is returned and assigned to toAdd. Tag#isDefault() is called to check if the returned Tag
is a DefaultTag. If so, a CommandException is thrown as default tags cannot be added by users.
We only have to handle the case of adding default tags in this step and not in the previous step as default tags are
already initialised into the study plan and hence Model#activeSpContainsTag(String tagName) will always return true
if the given name is a default tag name.
|
Step 4. Model#addTagToActiveSp(UserTag toAdd, String moduleCode) is called to add toAdd to the module with the
given module code. This method accesses the module with the given moduleCode, which will call Module#addTag(Tag tag)
to add toAdd to its UniqueTagList. In the case that toAdd already exists in the UniqueTagList, it will not be
added, and the method will return false. (Step 5)
| The above scenario should not occur if a new tag had been created as described in Step 2. |
Otherwise, the toAdd will be added and the method will return true. (Step 6)
Step 5. If the tag had not been added, it would indicate that an essentially identical tag had already been attached to
the target module. Hence, a CommandException will be thrown.
Tag has a method Tag#isSameTag to identify essentially identical tags by comparing the tag names for UserTag
(this is case-insensitive) and the DefaultTagType for DefaultTag.
|
Step 6: If the tag had been added, a CommandResult with a success message is returned.
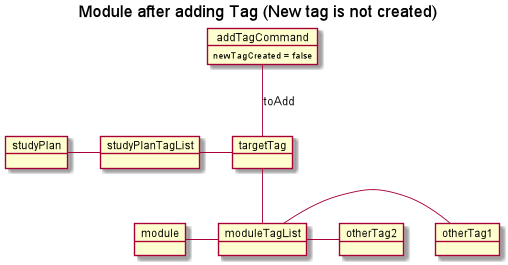
The following sequence diagram and activity diagram show how the addtag command works:
addtag command execution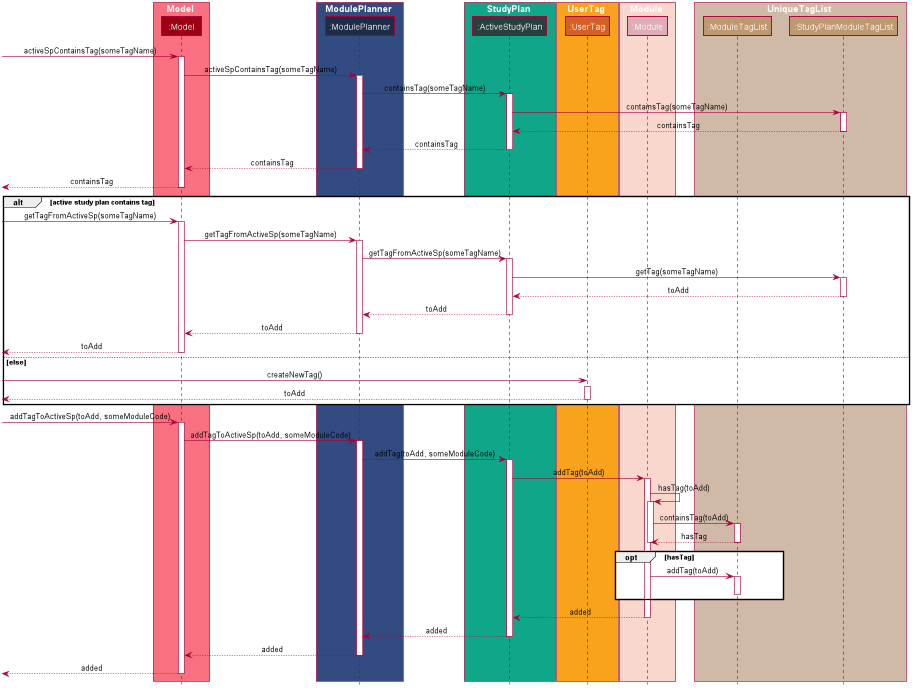
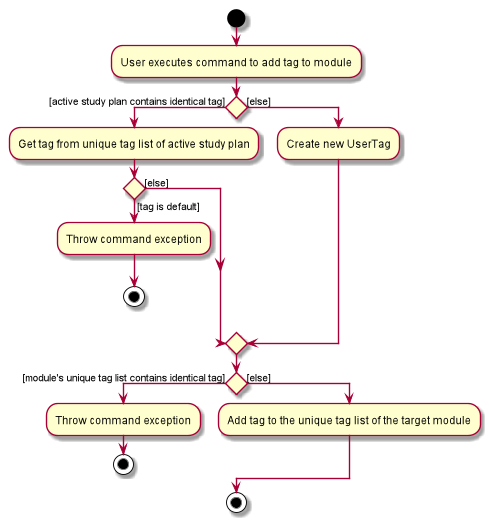
| The command exceptions in the above activity diagram should actually point to a single stop at the end. There are multiple stops in the above diagram as PlantUML does not support having a single stop and [] for branch labels in one syntax. |
3.6.2. Design Considerations
Aspect: How tags are assigned to modules
-
Alternative 1 (current choice): A tag with a given name is only created once. Adding a tag to a module simply creates a reference from the module to the existing tag.
-
Pros: Reduces memory usage, promotes consistency and makes duplication checking easier (simply check the
UniqueTagListof theStudyPlaninstead of checking the list in everyModule). -
Cons: More difficult to implement and requires searching and reassignment of pointers every time the command is executed.
-
-
Alternative 2: A new tag is created every time a tag is added even if there is already an existing tag with the same name.
-
Pros: Easier to implement as no searching of previous tags need to be done.
-
Cons: Increases memory usage, ensuring consistency and duplication checking might be more difficult (have to check the
UniqueTagListof everyModuleinstead of just the one in theStudyPlan.
-
3.7. Module Information and Verification
3.7.1. Implementation
The reading of modules information is facilitated by ModulesInfo, which contains a list of ModuleInfo objects.
All information regarding our modules are initially stored in json format, within the file
src/main/resources/modules_cs.json.
Information in a ModuleInfo object includes:
-
code: Module code -
name: Module name -
mc: MC count -
su: Whether the module can be S/U-ed -
isCore: Whether the module is a core module -
focusPrimaries: List of focus area primaries -
focusElectives: List of focus area electives -
description: Module description -
prereqTree: Module’s prerequisite tree
Upon starting the main app, the data is read once into a ModulesInfo object, which contains a list
of ModuleInfo objects — it is then passed into our model, whereby our ModelManager holds it as a reference.
Upon creating a study plan, the module planner will create the relevant Module objects, whose information
matches their corresponding ModulesInfo objects. Each Module object should correspond to exactly one
ModuleInfo object (with the same module code).
3.7.2. Prerequisite checking
To facilitate prerequisite checking, we have an interface PrereqTree, implemented by two classes
PrereqLeaf and PrereqNode.
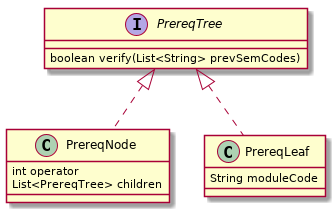
Each PrereqLeaf represents a module prerequisite. Each PrereqNode has an AND or OR operator — for instance,
(CS2030 AND CS2040) would be represented by a PrereqNode with the operator AND, with two PrereqLeaf leaves:
one for CS2030, and one for CS2040.
Importantly, PrereqTree contains the method verify(List<String> prevSemCodes). Given a list of strings of module
codes taken in previous semesters, the prerequisite tree will return a boolean value, signalling if the module already
has its prerequisites satisfied.
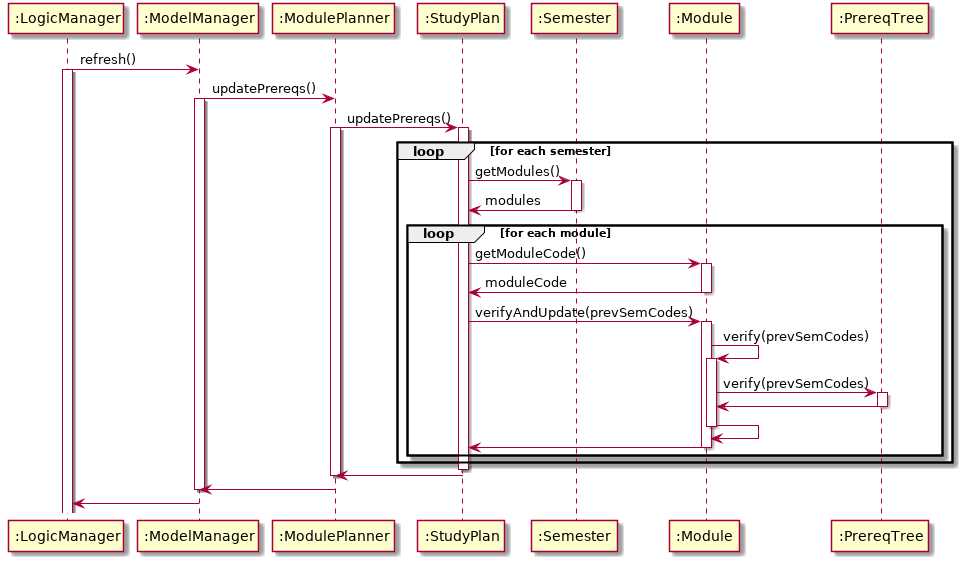
Upon executing any command, the method refresh() will be called in the module manager, which verifies the prerequisites
of every Module and updates them in the GUI. Modules that do not have their prerequisites fulfilled will be shown
with a red tag beside it.
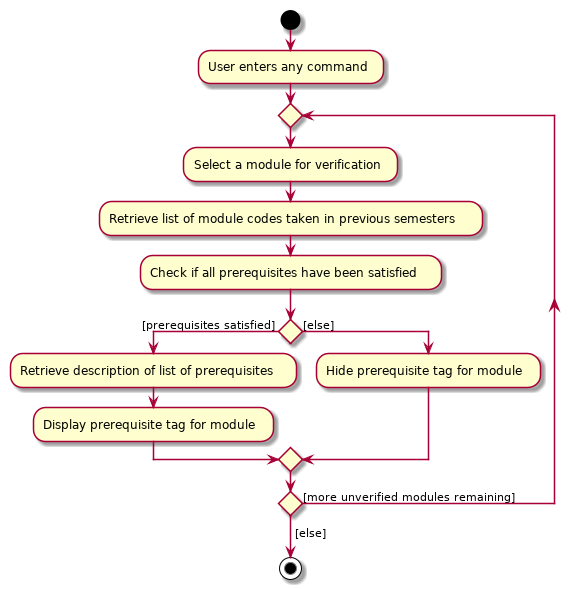
The following activity diagram shows how the verification works for each module:
3.7.3. Design Considerations
Aspect: Relationship between a module and its module information
-
Alternative 1 (current choice): All
ModuleInfoobjects are only created once upon initialising the application, one for each CS module. When creating aModuleobject, it then finds the correspondingModuleInfoobject (with the same module code), then derives its attributes (e.g. name, MC count, tags) from it.-
Pros: The json file is only read once to create all
ModuleInfoobjects at once, which is more efficient. -
Cons: It could lead to greater code complexity, as the model manager needs to keep track of not only
Moduleobjects, but alsoModuleInfoobjects.
-
-
Alternative 2: Whenever a new
Moduleobject is created, it re-reads the json file to read in the necessary information.-
Pros: The module manager does not need to persistently hold on to the same list of
ModuleInfoobjects. -
Cons: It performs the same reading action multiple times, which could lead to slowdowns.
-
3.8. Autocomplete
3.8.1. Implementation
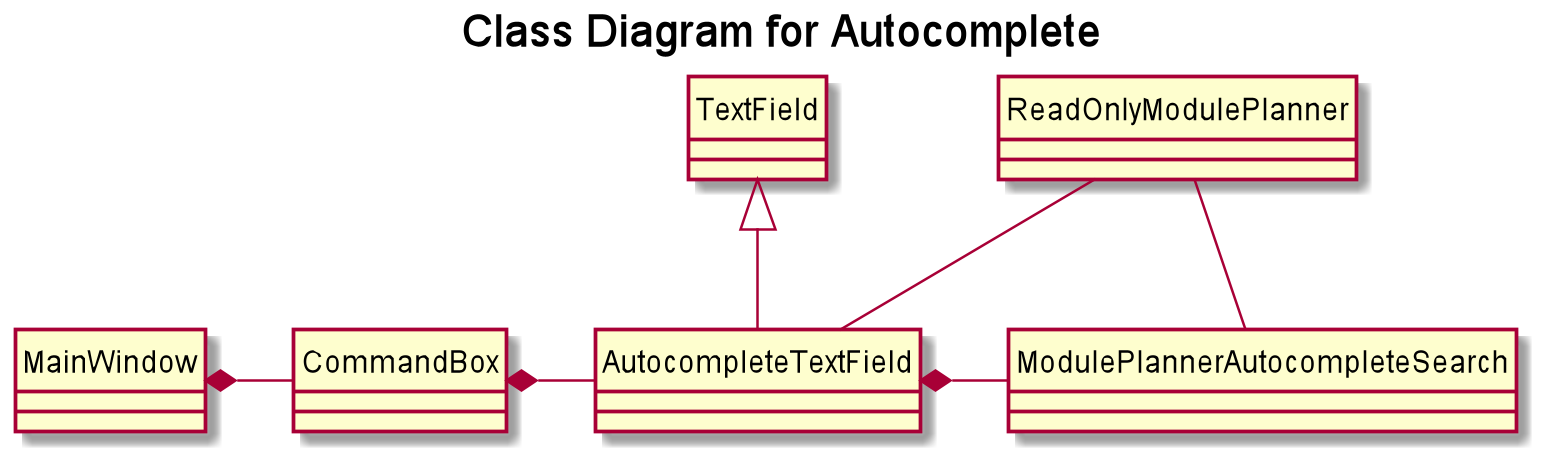
The autocompletion of keywords is facilitated by AutocompleteTextField, which inherits from Textfield,
and ModulePlannerAutocompleteSearch.
AutocompleteTextField handles user input and changing the text in the text field.
ModulePlannerAutocompleteSearch handles the autocorrect searching for keywords.
When the MainWindow is created, a CommandBox is created and added to the GUI.
The CommandBox creates an AutocompleteTextField and it is added to the GUI.
The AutocompleteTextField holds a ModulePlannerAutocompleteSearch.
CommandBox attaches a keyEvent listener to AutocompleteTextField that listens for the TAB key press,
which starts the autocomplete process.
ModulePlannerAutocompleteSearch holds two sets of keywords, a set for commands and a set for arguments.
These keywords are represented as SortedSet<String>.
Within each input, the first word will be autocompleted with the set for commands,
while subsequent words (separated by spaces) will be autocompleted with the set for arguments.
An exception is the help command, in which the subsequent words will be autocompleted with the
set for commands.
ModulePlannerAutocompleteSearch is constructed with a ReadOnlyModulePlanner.
It is used to create the keyword sets.
Hence, AutocompleteTextField is also constructed with a ReadOnlyModulePlanner to pass this down.
The following sequence diagram shows the creation of Autocomplete:
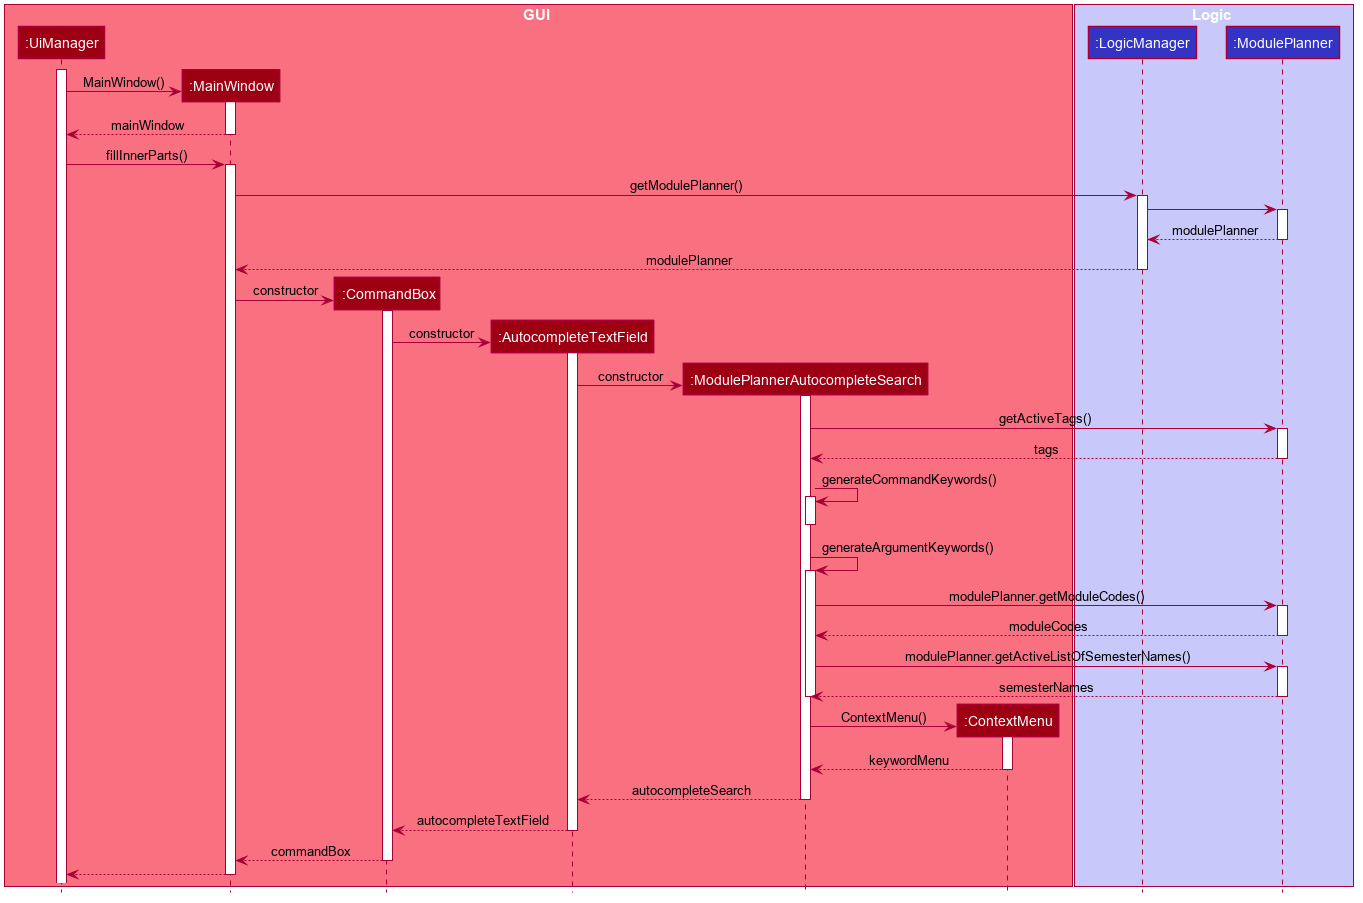
AutocompleteTextField holds the following public operations:
-
AutocompleteTextField#handleAutocomplete— Handles the entire autocomplete process based on the current text. -
AutocompleteTextField#handleChangeOfActiveStudyPlan— Resets the argument keywords when there is a change in the active study plan.
ModulePlannerAutocompleteSearch is never accessed by any external classes.
Given below is an example usage scenario of the AutocompleteTextField#handleAutocomplete() operation
and how the autocomplete mechanism behaves at each step for commands.
Step 1. The user enters the beginning of a command into the GUI text field, for example "addt" for addtag.
The user then presses the activation key TAB with begins the autocomplete process.
The KeyEvent listener calls the AutocompleteTextField#handleAutocomplete() operation.
Step 2: AutocompleteTextField passes the input to ModulePlannerAutocompleteSearch, by calling
ModulePlannerAutocompleteSearch#getSearchResults(String input).
In ModulePlannerAutocompleteSearch, the text in the text field is checked.
As it is the first word, the keywords set for commands is used.
ModulePlannerAutocompleteSearch#performSearch(String input, SortedSet<String> keywords)
is called to proceed with the search.
Step 3: This method finds search results, which is a subset from the keywords set for commands that begin with the input.
This result is returned back through ModulePlannerAutocompleteSearch#getSearchResults(String input).
AutocompleteTextField#handleAutocomplete() uses the search results to proceed.
There are two possible scenarios that are described in Steps 4 and 5.
Step 4: If there is only one search result,
AutocompleteTextField#setAutocompleteText(String searchResult) is called. Proceed to Step 6.
Step 5: If there is more than one search result, a menu will be created for the user to make a selection.
This method will call the populateMenu(List<String> searchResult) method, and then show the menu if it is not showing.
Then, focus will be requested from the first menu item in the menu. The populateMenu(List<String> searchResult)
populates a ContextMenu with CustomMenuItem, which correspond to each search result.
On action of the menu item, either through clicking or pressing the key ENTER while it is focused,
AutocompleteTextField#setAutocompleteText(String searchResult) is called. Proceed to Step 6.
Step 6: AutocompleteTextField#setAutocompleteText(String searchResult)
causes the input text to be changed to the search result and the caret
positioned at the end of the line.
The autocomplete mechanism behaves similarly for arguments, except the argument set of keywords will be used.
Furthermore, AutocompleteTextField#setAutocompleteText(String searchResult) will cause
the input text to be changed to the text before the space concatenated with a space and the search result
and the caret is positioned at the end of the line.
This change replicates autocompleting only the last word without erasing previous terms.
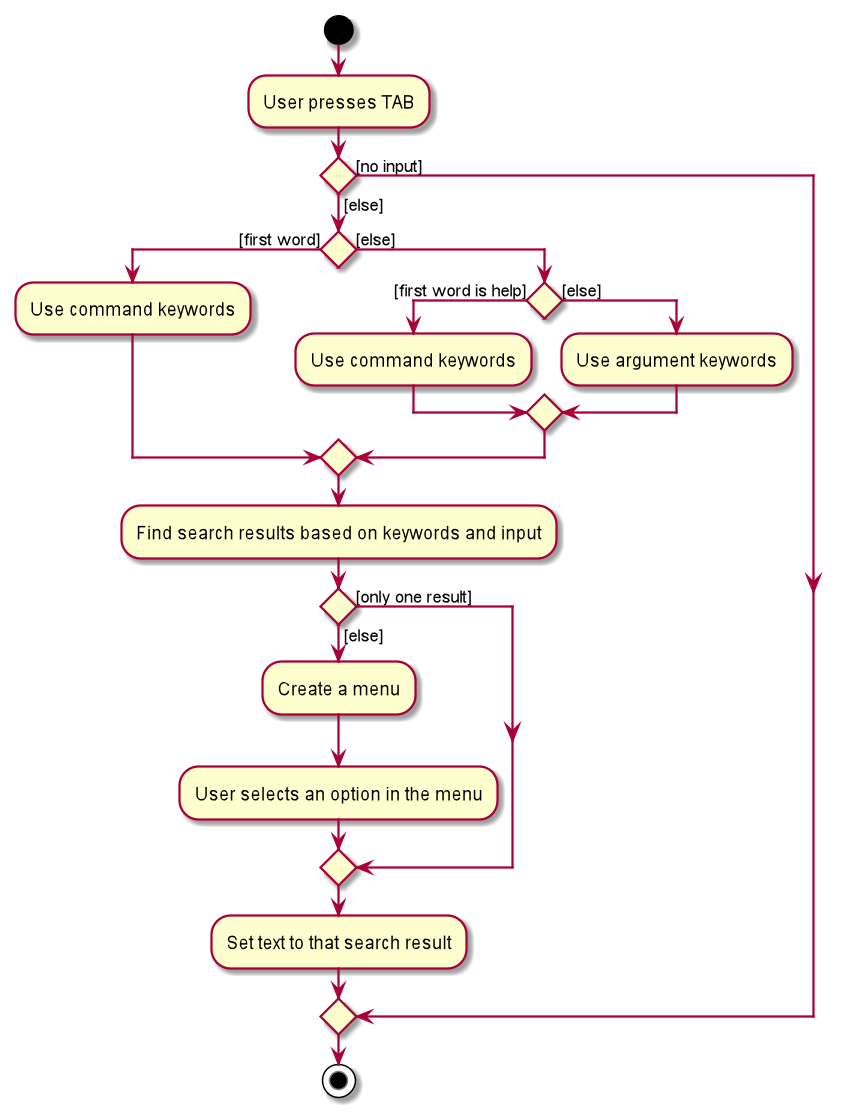
The following activity diagram shows how the autocomplete works:
3.8.2. Design Considerations
Aspect: How autocompletion is broken down
-
Alternative 1 (current choice): One class for handling the text field, one class for handling the querying.
-
Pros: Easier for testing. More cohesion.
-
Cons: More classes written.
-
-
Alternative 2 : One class to handle everything.
-
Pros: Easier to code.
-
Cons: Harder to test.
-
Aspect: How arguments are completed
-
Alternative 1 (current choice): All arguments including semester names, tags and module codes are checked for together.
-
Pros: Easy to implement.
-
Cons: User may want to only be autocompleting for tags, but module codes appear as well.
-
-
Alternative 2: Arguments are identified as tags or module codes and autocompleted based on the command.
-
Pros: User can autocomplete without undesired suggestions.
-
Cons: The command will have to be parsed upon autocomplete call, which will take more time and alter the structure of parsing commands.
-
Aspect: How help is implemented
-
Alternative 1 (current choice): Help is treated as a special case.
-
Pros: Easy to implement. Help is the only command that takes in commands as arguments.
-
Cons: A hard-coded exception does not make the code extensible.
-
-
Alternative 2: Every command is parsed and their keywords identified.
-
Pros: More extensible as help is future commands can take in commands as keywords.
-
Cons: The command will have to be parsed upon autocomplete call, which will take more time and alter the structure of parsing commands.
-
4. Documentation
Refer to the guide here.
5. Testing
Refer to the guide here.
6. Dev Ops
Refer to the guide here.
Appendix A: Product Scope
Target user profile:
-
Undergraduate CS student studying in NUS
-
Needs to manage his/her study plans and module planning
-
Needs to see whether his/her study plans are feasible
-
Prefer desktop apps over other types
-
Can type fast
-
Prefers typing over mouse input
-
Is reasonably comfortable using CLI apps
Value proposition:
-
Functionality is not offered by any other existing application.
-
Tailored to needs of NUS CS undergraduate students.
-
Users will be able to check all the problems (e.g. graduation requirements, prerequisite for modules) with their current study plan with ModBuddy through a desktop application.
-
Have multiple study plans, and move semesters around quickly with a CLI.
-
Version control for saving history of study plans, ensuring that mistakes or past study plans are recoverable.
-
Suits users who are able to type fast and can manage their study plan faster.
Appendix B: User Stories
Priorities: High (must have) - * * *, Medium (nice to have) - * *, Low (unlikely to have) - *
| Priority | As a … | I want to … | So that I can… |
|---|---|---|---|
|
student |
add modules to the planner |
|
|
student |
remove modules from the planner |
|
|
student |
search a module based on module code |
|
|
student |
declare my focus area |
|
|
student |
ensure that my modules can fulfill my focus area requirements |
|
|
student who wants to graduate |
know whether I will fulfill my graduation requirements with my current study plan |
I can graduate on time |
|
user |
check a module’s prerequisites |
I can confirm I’ve satisfied them in previous semesters before taking the module this semester |
|
user |
set my current semester |
|
|
foolish user |
be warned if any part of my study plan is not feasible |
|
|
indecisive user |
move modules across semesters |
I can change the order at which I plan to take my modules |
|
forgetful user |
view which modules I have already taken |
I know what modules I do not have to take anymore |
|
Year 1 user |
view the core modules |
I know which modules I should take first |
|
new user |
view help instructions |
I know how to use the application easily |
|
clumsy user |
be greeted with helpful error messages when I enter commands or their arguments wrongly |
|
|
meticulous student |
create multiple versions of study plan |
I can toggle between them and choose the most suitable one when circumstances change |
|
Year 1 user |
view which modules can be S/U-ed |
I can prioritise those modules to be taken in Year 1 |
|
user with friends |
download a copy of my study plan |
I can share it with others. |
|
user |
check the total number of MCs in my module plan this semester |
I know if I need to take more modules or if I’m overloading. |
|
foolish user |
undo my previous command |
I can restore the previous state whenever I make mistakes. |
|
Year 1 user |
start out with a default module plan |
I have an idea of what modules are recommended to be taken in which semesters |
|
ambitious student |
to block out a semester |
I can plan for SEP/NOC/industrial attachment. |
|
lazy student |
see a brief description/name of a module |
I don’t have to memorise all the module codes |
|
student |
search a module based on keywords |
|
|
diligent student |
tag my modules so as to classify them better |
|
|
student |
fill my study plan with UEs too |
|
|
student |
rename UEs as their actual names |
|
|
visual user |
be able to visualise my modules in a GUI |
|
|
experienced user |
chain my commands together so that I can be more efficient |
|
|
student who admires beauty |
see different colours |
|
|
forgetful student |
attach more information to each semester |
I will remember why I plan my modules this way |
|
fickle user |
combine different semesters from different study plans into one new study plan (move semesters around) |
I don’t have to repeat. |
|
student who wants to be a TA |
indicate I will be TA-ing a module in a given semester |
|
|
CS student with extra programmes |
I want to verify that my study plan allows me to graduate with all the different requirements I have |
|
|
overachiever |
I want to see how joining one of these Turing/von Neumann programmes affects my study plan |
|
|
student who wants to be a TA |
indicate I will be TA-ing a module in a given semester |
|
|
CS student with extra programmes |
I want to verify that my study plan allows me to graduate with all the different requirements I have |
|
|
CS student with friends |
I want to plan modules with my friends |
we can take the same modules every semester |
|
student who cares about grades |
I want to be able to analyse my CAP per module, semester, year and overall |
I can be more aware of my grades |
|
user who admires beauty |
I want to set each module with a color 1-8 |
I can customise the look of my study plan |
|
user who admires beauty |
I want to change the color theme |
I can customise the look of my study plan |
|
experienced user who admires beauty |
I want to change specific colors with hex code |
I can customise the look of my study plan |
Appendix C: Use Cases
(For all use cases below, the System is the ModBuddy and the Actor is the Student, unless specified otherwise)
C.1. Use case: UC01 - Create study plan
MSS
-
User chooses to create a study plan.
-
User enters the title of the study plan.
-
ModBuddy displays the new study plan.
Use case ends.
Extensions
-
2a. User chooses not to enter a title.
-
2a1. ModBuddy creates a new study plan with a default title.
-
2a2. Use case resumes from step 3.
Use case ends.
-
C.2. Use case: UC02 - Add module
MSS
-
Student requests to add a module to a particular semester.
-
ModBuddy displays changes to study plan.
Use case ends.
Extensions
-
1a. ModBuddy detects that the module entered does not exist.
-
1a1. ModBuddy prompts Student to enter a correct module code
-
1a2. User enters new module.
Steps 1a1-1a2 are repeated until the data entered are correct.
Use case ends. === Use case: UC03 - Commit a study plan
-
MSS
-
Student requests to save the current version of the study plan.
-
ModBuddy confirms that the version has been saved.
Use case ends.
Extensions
-
1a. ModBuddy detects that there have been no changes to the study plan from the previous commit.
-
1a1. ModBuddy informs Student that the current version has already been saved.
Use case ends.
-
C.3. Use case: UC04 - Tag a module
MSS
-
Student requests to tag a module
-
ModBuddy requests student to enter a tag name.
-
ModBuddy displays changes to study plan.
Use case ends.
Extensions
-
1a. ModBuddy detects that the module entered does not exist.
-
1a1. ModBuddy prompts Student to enter a correct module code
-
1a2. User enters new module.
Steps 1a1-1a2 are repeated until the data entered are correct.
Use case resumes from step 3.
-
-
2a. ModBuddy detects that the module already has the tag.
-
2a1. ModBuddy does not add a new tag.
Use case ends.
-
C.4. Use case: UC05 - Correct modules without a prerequisite
MSS
-
ModBuddy highlights a module in red because its prerequisites have not been fulfilled.
-
Student checks the prerequisites of the module.
-
ModBuddy displays all a module’s prerequisites that have yet to be fulfilled in previous semesters.
-
Student adds the unfulfilled module prerequisite to a selected previous semester.
-
ModBuddy un-highlights the module now that its prerequisites have been fulfilled.
Use case ends.
Extensions
-
1a. Student decides not to take the module.
-
1a1. Student removes the module from the semester.
Use case ends.
-
-
3a. Student checks if the module to be added is valid in a selected previous semester.
Use case resumes from step 4.
C.5. Use case: UC06 - Chaining commands
MSS
-
User chooses to chain multiple commands
-
User inputs the multiple commands.
-
ModBuddy displays the changes as specified.
Use case ends.
Extensions
-
2a. User chooses to chain different commands with ‘&&’.
-
2b. User chooses to chain same commands with multiple arguments.
Appendix D: Non Functional Requirements
-
Should work on any mainstream OS as long as it has Java 11 or above installed.
-
Should be able to hold up to 10 study plans, each containing at least 40 modules, without a noticeable sluggishness in performance for typical usage.
-
Should allow a user with above average typing speed for regular English text (i.e. not code, not system admin commands) to accomplish most of the tasks faster using commands than using the mouse.
-
Should allow a user to accomplish all of the tasks without an Internet connection.
-
The module information should be applicable to all NUS Computer Science students without additional programmes (such as Double Degree Programmes).
-
Should allow a user who is relatively familiar with CS module codes to manipulate modules faster using module codes than using module names.
-
The response to any use action should become visible within 1 second.
-
The user interface should be intuitive enough for users who are not IT-savvy
-
The source code should be open source.
-
The product should be free for all NUS CS undergraduate students.
-
Should warn the user that the developers will not be held liable for any failure to graduate within normal candidature period due to the use of the product.
Appendix E: Glossary
- Active study plan
-
The study plan that is currently editable by various commands. Also known as the active plan for short.
- CLI
-
Abbreviation for Command Line Interface, which is a text-based user interface used to view and manage information related to study plans in our application.
- Command
-
An instruction that the user enters into the text input field of our application. A valid command will result in a successful operation on viewing or manipulating the study plan(s).
- Commit
-
A version of a study plan that the user saves to a local file. The user may opt to view or revert to a particular version of any study plan.
- Core module
-
A core module is compulsory for all students in the NUS Computer Science course in order to fulfill the graduation requirements. Such modules include:
-
Computer Science Foundation
-
CS1101S Programming Methodology
-
CS1231S Discrete Structures
-
CS2030 Programming Methodology II
-
CS2040S Data Structures and Algorithms
-
CS2100 Computer Organisation
-
CS2103T Software Engineering
-
CS2105 Introduction to Computer Networks
-
CS2106 Introduction to Operating Systems
-
CS3230 Design and Analysis of Algorithms
-
-
IT Professionalism
-
IS1103/X IS Innovations in Organisations and Society
-
CS2101 Effective Communication for Computing Professionals
-
ES2660 Communicating in the Information Age
-
-
Mathematics & Sciences
-
MA1521 Calculus for Computing
-
MA1101R Linear Algebra I
-
ST2334 Probability and Statistics
-
One Science Module
-
-
- Co-requisite
-
Co-requisites are modules that are to be taken concurrently.
- CS
-
Abbreviation for Computer Science, the study of processes that interact with data and that can be represented as data in the form of programs. In particular, CS here refers to the course for Bachelor of Computing in Computer Science (with Honours) offered by School of Computing (SoC), National University of Singapore (NUS).
- Current Semester
-
The semester in which the user is currently taking modules. All modules taken before the current semester are considered completed.
- Default study plan
-
The recommended study plan for a CS freshman, pre-populated with core modules arranged in their recommended semesters of study.
- Elective
-
Refer to UE.
- Feasibility
-
The feasibility of a study plan, or part of a study plan, refers to whether the following conditions are met:
-
All modules are taken after their prerequisites have been taken.
-
All modules are not taken together with any of their respective preclusions.
-
The user, by following this study plan, satisfies their graduation requirements and will be able to graduate without extending their candidature in NUS.
-
- Focus area
-
CS modules are organised into Focus Areas of coherent modules according to technical areas of study. A CS Focus Area is satisfied by completing 3 modules from the Area Primaries, with at least one module at 4000-level or above. CS Foundation Modules (CFM) that appear in the Area Primaries can be counted as one of the 3 modules towards satisfying a Focus Area. In this case, a student has to read just two other modules in the Area Primaries to satisfy the Focus Area. The ten Focus Areas are listed below:
-
Algorithms & Theory
-
Artificial Intelligence
-
Computer Graphics and Games
-
Computer Security
-
Database Systems
-
Multimedia Information Retrieval
-
Networking and Distributed Systems
-
Parallel Computing
-
Programming Languages
-
Software Engineering
-
- Graduation
-
To graduate from NUS CS means to complete all the stipulated requirements within the user’s candidature period, and finish their studies with a Bachelor’s degree.
- GUI
-
Abbreviation for the Graphical User Interface, which allows users to interact with electronic devices through graphical icons and visual indicators as opposed to a Command Line Interface (CLI).
- Leave of Absence
-
Also known as LOA for short. During LOA, students will temporarily stop taking NUS modules for an extended period of time, usually one semester. Students may be granted leave of absence for the following reasons:
-
Medical reasons
-
Academic reasons
-
Personal reasons
-
- Mainstream OS
-
Windows, Linux, Unix, OS-X.
- Mainstream semester
-
Semesters 1 and 2 in Years 1, 2, 3 and 4. These are the default semesters for a CS single-degree undergraduate. In contrast, a non-mainstream semester is a special term (e.g. Y1ST1) or a Year 5 semester (e.g. Y5S1).
- Major
-
An academic major is the academic discipline to which an undergraduate student formally commits. A student who successfully completes all modules required for the major qualifies for an undergraduate degree.
- Minor
-
A Minor programme is a coherent course of study providing significant depth in a certain area outside that of the Major, within or outside the student’s department.The modular credit (MC) requirement for a Minor programme should be at least 24MCs, of which up to 8MCs may be used to meet the requirements for both the Minor and a Major or another Minor subject to the agreement of the particular department(s), faculty/faculties or programme(s) hosting the Minor.
- Modular credits
-
The undergraduate and graduate curricula are based on a modular system. Under this system, workloads are expressed in terms of Modular Credits (MCs), and academic performance is measured by grade points on a 5-point scale.
- Module
-
A module (colloquially mod) is a class of a specific topic that generally runs for an entire semester. Each module carries a stipulated number of Modular Credits and requires weekly contact hours for students.
- Module code
-
Each module of study has a unique module code consisting of a two- or three-letter prefix that denotes the discipline, and four digits, the first of which indicates the level of the module (e.g., 1000 indicates a Level 1 module and 2000, a Level 2 module). Modules offered by the Department of Computer Science generally start with CS.
- NUS Overseas Colleges
-
The NUS Overseas Colleges Programme, or NOC for short, is an internship programme with strong emphasis on technology entrepreneurship. Selected candidates will spend either 6 or 12 months with a high-tech start-up and take entrepreneurship courses at a designated partner university. NOC students will be full-time interns and part-time students.
- NUS
-
The National University of Singapore (NUS) is the first autonomous research university in Singapore. NUS is a comprehensive research university, offering a wide range of disciplines, including the sciences, medicine and dentistry, design and environment, law, arts and social sciences, engineering, business, computing and music at both the undergraduate and postgraduate levels. Computer Science (CS) is one of the undergraduate programmes offered by NUS.
- Preclusion
-
A module may also specify certain preclusions. These are modules that have similar emphases and may not be taken together with that particular module.
- Prerequisite
-
Pre-requisites indicate the base of knowledge on which the subject matter of a particular module will be built. Before taking a module, a student should complete any pre-requisite module(s) listed for that particular module. Where pre-requisites are specified, equivalent modules will also be accepted. If in doubt, students should consult the module instructor or the Department academic advisor regarding the acceptable equivalent modules.
- Semester
-
An academic year in NUS consists of two regular semesters, each spanning 13 weeks excluding the recess and reading weeks. In our application, a semester can be either a mainstream semester (see above) or a special semester (usually during summer).
- Student
-
Our application is specifically targeted to students who study Computer Science (CS) in the School of Computing in the National University of Singapore (NUS).
- Student exchange programme
-
The NUS Student Exchange Programme, or SEP for short, provides students with the opportunity to study in an overseas partner university, usually for a semester or two, with approval of the School, to further enhance their learning experience. Students from either partner university pay fees only at their home institution while on exchange.
- Study plan
-
A study plan is an academic plan detailing all modules that a student plans to take in all the semesters in their candidature in NUS. One study plan comprises 8 semesters of modules. The user may have multiple alternative study plans.
- S/U
-
Abbreviation for Satisfactory / Unsatisfactory Options. Sometimes abbreviated as SU. In general, students may exercise the S/U option for up to 32 MCs in the first two regular semesters; if this is not fully utilised, the S/U option may still be exercised in subsequent semesters, for up to 12 MCs. Modules with grades as S/U are not factored into the calculation of students' Cumulative Average Points (CAP). Modules on which the S/U option can be exercised are described as SU-able.
- Tag
-
A module can be added a tag or multiple tags, which include the following:
-
core module
-
UE
-
focus area etc
-
- UE
-
UE stands for Unrestricted Elective. Unrestricted Electives enable students to pursue their academic interests and aspirations. Students may also use Unrestricted Electives to satisfy partially or wholly the requirements of other programmes. As long as the appropriate prerequisites are met, students can satisfy the Unrestricted Electives requirement by taking modules from any of the Departments/Faculties at any level. The limit on the number of Level-1000 modules to be counted towards fulfilment of graduation requirements is 60 MCs for 160-MC programmes. In CS, a student needs to fulfill at least 32 MCs of UEs before graduation.
- Valid module
-
A module is said to be valid if its prerequisites have been fulfilled and none of its preclusions are being taken at the same time as the student takes that particular module.
- Year of study
-
A student’s year refers to whether the student is in their first (Y1), second (Y2), third (Y3), fourth (Y4), or fifth (Y5) year of undergraduate studies in NUS.
Appendix F: Instructions for Manual Testing
Given below are instructions to test the app manually.
| These instructions only provide a starting point for testers to work on; testers are expected to do more exploratory testing. |
F.1. Launch and Shutdown
-
Initial launch
-
Download the jar file and copy into an empty folder
-
Double-click the jar file or run
java -jar csmodbuddy.jarin command prompt (Windows) or terminal (Mac)
Expected: Shows the GUI with a default study plan. The window size may not be optimum.
-
-
Saving window preferences
-
Resize the window to an optimum size. Move the window to a different location. Close the window.
-
Re-launch the app by double-clicking the jar file or running
java -jar csmodbuddy.jarin command prompt/terminal.
Expected: The most recent window size and location is retained.
-
F.2. Executing basic commands
-
Help
-
Test case:
help
Expected: A list of commands will be displayed, with brief descriptions of what they do.
-
-
Help specific
-
Test case:
help addmod
Expected: An explanation of the addmod command will be displayed.
-
-
Autocomplete
-
Test case:
remove, then pressTAB
Expected: A menu will appear with possible autocompletions that can be selected with up and down keys.
Things in the menu will be: removealltags, removecommit, removemod, removeplan, removepriority, removesem, removetag. -
Test case:
ac, then pressTAB
Expected: The command box will be filled withactivate.
-
-
Undo
-
Test case:
undo
Expected: The previous command will be undone. However, note thatundodoes not work for commands that simply display information, such ashelp, or to commands that alter commits, such ascommit.
-
-
Redo
-
Test case:
redo
Expected: The command that was undone will be redone.
-
F.3. Executing module-related commands
-
Adding a module
-
Prerequisites
-
Module must be a valid Computer Science core module.
-
The current ModulePlanner must have an existing active study plan.
-
The active study plan must have the given semester.
-
The semester must not be blocked.
-
Study plan does not have any semester that contains the given module already.
-
-
Test case:
addmod y2s1 cs2102
Expected: If there exists an active study plan, the study plan has the given semester and the study plan does not contain any semester that hasCS2102, thenCS2102will be added toY2S1. Else, an error message will show according to which criteria it failed. -
Test case:
addmod y2s1 cs2103 cs2104
Expected:CS2103andCS2104will be added toY2S1. Else, an error message will show according to which criteria it failed.
-
-
Removing a module
-
Prerequisites
-
Module must be a valid Computer Science core module.
-
The current ModulePlanner must have an existing active study plan.
-
The active study plan must have the given semester.
-
The semester must not be blocked.
-
Module exists in the given semester.
-
-
Test case:
removemod cs2102 y2s1
Expected: If there exists an active study plan, the study plan has the given semester and the semester containsCS2102, thenCS2102will be removed toY2S1. Else, an error message will show according to which criteria it failed.
-
-
Finding a module
-
Prerequisite
-
The module must exist in the study plan.
-
-
Test case:
findmod CS1101S
Expected: The semester in which CS1101S is located will appear in the left panel.
-
F.4. Executing semester-related commands
-
Adding a semester
-
Prerequisite
-
There is at least one study plan. (i.e. There is a current active study plan)
-
-
Test case:
addsem y1st1note that the semester must be a special term or a Year 5 semester
Expected: The semesterY1ST1will appear on the right panel of GUI. You can add modules etc to this semester from now on.
-
-
Removing a semester
-
Prerequisite
-
There is at least one study plan. (i.e. There is a current active study plan)
-
-
Test case 1:
removesem y1st1note that the semester is a special term or a Year 5 semester in this case
Expected: The semesterY1ST1will disappear from the right panel. -
Test case 2:
removesem y1s1note that the semester is a regular semester in this case
Expected: The semesterY1S1will have all its modules cleared. But this semester will still remain on the right panel since it is one of the default semesters.
-
-
Set current semester
-
Prerequisites
-
The current ModulePlanner must have an existing active study plan.
-
The active study plan must have the given semester.
-
-
Test case:
setcurrent y1s1
Expected:Y1S1will be reflected as the current semester in the GUI. Modules in the previous semesters will have theCompletedtag assigned to them, and the MC count of the study plan will be updated as well.
-
-
Blocking a semester
-
Prerequisites
-
The current ModulePlanner must have an existing active study plan.
-
The active study plan must have the given semester.
-
Semester is not blocked.
-
-
Test case:
block y1s1 LOA
Expected: If there exists an active study plan, the study plan has the given semester, then the semester will be blocked and it will reflect in the GUI as a darker shade of grey. The reason will also be shown.
-
-
Unblocking a semester
-
Prerequisites
-
The current ModulePlanner must have an existing active study plan.
-
The active study plan must have the given semester.
-
Semester is blocked.
-
-
Test case:
unblock y1s1 LOA
Expected: If there exists an active study plan, the study plan has the given blocked semester, then the semester will be unblocked and it will reflect in the GUI.
-
F.5. Executing tagging-related commands
-
Tagging a module
-
Prerequisites
-
A tag name has to be a single word, less than 25 characters long and not be a default tag name.
-
The target module must exist.
-
-
Test case:
addtag cs1101s exchange
Expected: If CS1101S is currently in the study plan, a new tag with the name "exchange" can be seen below the module CS1101S. If CS1101S is not in the study plan, add it to the study plan and the tag can be seen attached to it. The tag will also be in the list whenviewalltagsis called. -
Test case (after (b)):
addtag cs1101s EXCHANGE
Expected: No new tag is added since CS1101S already has the tag "exchange".
-
-
Renaming a module tag
-
Prerequisites
-
The new tag name has to be a single word, less than 25 characters long and not be a default tag name.
-
The target tag (e.g. "exchange") must exist in the study plan.
-
-
Test case:
renametag exchange sep
Expected: All the tags named "exchange" will be renamed to "sep".
-
-
Removing a tag from a module
-
Prerequisites
-
The target tag (e.g. "exchange") must exist in the target module.
-
-
Test case:
removetag cs1101s exchange
Expected: The tag will be removed from CS1101S only.
-
-
Deleting a module tag
-
Prerequisites
-
The target tag (e.g. "exchange") must exist in the study plan.
-
-
Test case:
deletetag exchange
Expected: The tags named "exchange" will be removed from all the modules they are attached to. The tag will not be in the list whenviewalltagsis called.
-
-
Viewing a module’s tags
-
Test case:
viewtags CS1101S
Expected: A left panel with a list of tags will appear. The tags that are in the list should include the default tagsCoreandS/U-able, as well as any other user-created tags that have been added.
-
-
Removing all tags
-
Test case:
removealltags
Expected: All user-created tags will be removed from all modules.
-
-
Viewing all modules tagged with a given tag
-
Prerequisites
-
The tags entered should exist in the study plan.
-
-
Test case:
viewtagged core s/u-able
Expected: A left panel with a list of all modules attached with both tags will appear.
-
-
Viewing all tags
-
Test case:
viewalltags
Expected: All tags, default and user-created, will appear in the left panel. Default tags have short descriptions attached.
-
-
Viewing all default tags
-
Test case:
viewdefaulttags
Expected: All default tags will appear in the left panel.
-
F.6. Executing study plan-level commands
-
Adding a study plan
-
Test case:
newplan first
Expected: A study plan with the titlefirstis created, and a unique ID is assigned to it. -
Test case:
newplan
Expected: A study plan without a title is created, and a unique ID is assigned to it. Note that this ID is unique and will not change throughout the life of the study plan.
-
-
Deleting a study plan
-
Prerequisite
-
The study plan ID must refer to an existing study plan. You can check this by the
listcommand.
-
-
Test case:
removeplan 1
Expected: The study plan with the ID1will be deleted. To check your study plans' indices, you can use thelistcommand. Note that since the IDs are unique, the IDs of the other study plans will not change after the deletion of this plan.
-
-
Listing all study plans
-
Prerequisite
-
There is at least one study plan.
-
-
Test case:
list
Expected: all study plans are listed.
-
-
Viewing another study plan
-
Prerequisite
-
The study plan ID must refer to an existing study plan. You can check this by the
listcommand.
-
-
Test case:
viewplan 1
Expected: The study plan with the ID1will be displayed in the left panel as a simplified view.
-
-
Activating another study plan
-
Prerequisite
-
The study plan ID must refer to an existing study plan. You can check this by the
listcommand.
-
-
Test case:
newplan titlethenactivate 2if the new plan’s ID is2
Expected: The study plan with the ID2will be displayed in the left panel as a simplified view.
-
-
Editing the title
-
Prerequisite
-
There is at least one study plan. (i.e. There is a current active study plan)
-
-
Test case:
title best plan
Expected: The active study plan (on the right) will have its title changed tobest plan.
-
-
Setting default study plan
-
Test case:
default
Expected: A new study plan with the titleRecommended Planwill be created and made active (shown on the right panel). A unique ID will be assigned to this plan too.
-
-
Setting the priority of a study plan
-
Prerequisite
-
There must be at least one study plan in the module planner.
-
-
Test case:
setpriority high 1
Expected: If there is a study plan with index 1, a red priority tag named "PRIORITY.HIGH" will appear next to the study plan title. If the index is invalid, an error message will be shown.
-
-
Removing the priority of a study plan
-
Prerequisite
-
The target study plan must have a priority tag
-
-
Test case:
removepriority 1
Expected: If the study plan has a priority tag, it will be removed. If the index is invalid or the study plan does not have a priority tag, an error message will be shown.
-
-
Listing study plans according to their priorities
-
Prerequisite
-
There are three study plans in the module planner, two set with priorities
low,highand one with no priority.
-
-
Test case:
listbypriority
Expected: A left panel with a list of study plans sorted in the order such that their priorities arehigh,lowand no priority.
-
F.7. Executing version tracking-related commands
-
Committing a study plan
-
Prerequisite
-
There is at least one study plan. (i.e. There is a current active study plan)
-
-
Test case:
commit some message
Expected: The state of the current study plan will be saved and committed. If you enterhistory, you can see this commit with the messagesome message.
-
-
Checking commit history
-
Prerequisite
-
There is at least one study plan. (i.e. There is a current active study plan)
-
-
Test case:
history
Expected: All the commits of this study plan will be listed. If there are no commits, it will prompt the user that there are no commits currently.
-
-
Viewing a commit
-
Prerequisite
-
There is at least one study plan. (i.e. There is a current active study plan). And there is at least one commit in its commit history.
-
-
Test case:
viewcommitfollowed by the commit number e.g.viewcommit 1.1. You can check the number usinghistory
Expected: The state of the study plan represented by the specified commit will be shown on the left panel as a simplified view.
-
-
Reverting to a commit
-
Prerequisite
-
There is at least one study plan. (i.e. There is a current active study plan)
-
There is at least one commit in its commit history.
-
-
Test case:
revertfollowed by the commit number e.g.revert 1.1. You can check the number usinghistory
Expected: The state of the study plan represented by the specified commit will be activated and shown on the right panel of the GUI. If you enterhistory, you will see a newRevert to …commit being newly added to the commit history.
-
-
Removing a commit
-
Prerequisite
-
There is at least one study plan. (i.e. There is a current active study plan)
-
There is at least one commit in its commit history.
-
-
Test case:
removecommitfollowed by the commit number e.g.removecommit 1.1. You can check the number usinghistory
Expected: The specified commit will be removed from the commit history permanently. If you enterhistory, you will see that the commit has disappeared. Note that the indices are based on the position of the commit in the commit list, so all the commit numbers will be shifted forward.
-
F.8. Executing information and verification-related commands
-
Checking for study plan requirements
-
Prerequisite
-
There must be an active study plan.
-
-
Test case:
check
Expected: The study plan requirements for your current study plan should be checked based on 3 criteria: total MC count of the study plan (both completed and uncompleted), number of core modules taken, and number of focus area primaries taken. The study plan satisfies graduation requirements only if all 3 criteria are met.
-
-
Describing a module
-
Test case:
description CS1101S
Expected: It should show the description of CS1101S, including module name, MC count, S/U-ability, prerequisites, and more.
-
-
Showing focus area primary modules
-
Test case:
showfocus
Expected: It should show a list of all focus area primary modules in the left panel, regardless of whether they are in the study plan or not.
-
-
Showing core modules
-
Test case:
showcore
Expected: It should show a list of all core modules in the left panel, regardless of whether they are already in the study plan or not.
-
-
Clearing all invalid modules
-
Prerequisite
-
There should be modules in the right panel that are invalid, in that not all prerequisites have been satisfied.
-
-
Test case:
clearinvalidmods
Expected: It should remove all modules that are invalid in the right panel. Note that this can cause new modules to become invalid as well.
-
-
Show valid modules
-
Test case:
validmods y1s1
Expected: It should show all valid modules that can be taken in Y1S1. Note that this may include the dissertation and internship, as their prerequisites are not expressible in terms of prerequisite modules.
-
F.9. Executing GUI-related commands
-
Expanding a semester
-
Test case:
expand y1s1
Expected: If Y1S1 was previously collapsed, it should be expanded now. If it was already expanded, no change will occur.
-
-
Expanding all semesters
-
Test case:
expandall
Expected: All semesters should be expanded.
-
-
Collapsing a semester
-
Test case:
collapse y1s1
Expected: If Y1S1 was previously expanded, it should be collapsed now. If it was already collapsed, no change will occur.
-
-
Collapsing all semesters
-
Test case:
collapseall
Expected: All semesters should be collapsed.
-
-
Changing the theme
-
Test case:
theme dark
Expected: The theme will become dark.
-