
Overview
CS ModBuddy is for those who prefer to use a desktop app for planning their modules. More importantly, CS ModBuddy is optimized for those who prefer to work with a Command Line Interface (CLI) while still having the benefits of a Graphical User Interface (GUI). The user interacts with it using a CLI, and it has a GUI created with JavaFX. It is written in Java, and has about 25 kLoC.
Summary of contributions
-
Code contributed: [Functional code] [Test code]
-
Major enhancements:
-
Added the ability to undo/redo previous commands
-
What it does: allows the user to undo all previous commands one at a time. Preceding undo commands can be reversed by using the redo command. It is important to that the undo and redo commands do not apply for commands that changes storage files.
-
Justification: This feature improves the product significantly because a user can make mistakes in commands and the app should provide a convenient way to rectify them.
-
Highlights: This enhancement affects existing commands and commands to be added in future. It required an in-depth analysis of design alternatives. The implementation too was challenging as it required changes to existing commands, as well as consideration of the complexity of the current model.
-
Credits: The implementation of the undo and redo commands were heavily inspired by its conceptualisation in Address Book 3. However, it was even more challenging to implement in this project because of the increased complexity and hierarchy of the model.
-
-
Revamped the parser such that prefixes are not required
-
What it does: allows the user to be able to input commands much more efficiently without needing to put a prefix before every command. For instance, to add
CS2103toY1S1, the user can simply enteraddmod CS2103 Y1S1. -
Justification: This feature improves the product significantly because a user can input his/her commands much faster without the use of prefixes.
-
Highlights: This enhancement affects existing commands and commands to be added in future. It required consideration of parser alternatives and highly precise error handling to make sure that the intended resutl is obtained from the parser.
-
-
-
Minor enhancements
-
Added a
setcurrentsemestercommand that sets the given semester as the current one. Semesters before the specified semester will be locked and therefore modules cannot be added or removed from them. -
Added a
blockcommand that block off the given semester, for reasons such as exchange, LOA, etc. The semester is then locked, and modules cannot be written to it. Theunblockcommand removes this lock from the semester.
-
-
Other contributions:
-
Enhancements to existing features:
-
Spearheaded initial tests for refactored models: Module, Semester, StudyPlan to increase coverage from 27% to 38% (Pull request #200)
-
Wrote additional tests for GUI and implemented them as headless tests (Pull request #324)
-
Improve aesthetics of GUI by fixing unintended bugs with colors (Pull request #246)
-
Implement reading of required resource file
modulesinfo.jsonfrom within the jar file (Pull request #217).
-
-
Project management:
-
Role: Git Expert and Integration
-
Managed releases from v1.1 to v1.3 on GitHub
-
-
Tools:
-
Initial setup of project tools - Github organisation, Travis CI, GH pages and Netlify.
-
Proposed and setup the use of the Github project board and issue tracker for project management, milestones and bugs.
-
Integrated a new Github plugin (Codacity) to the team repo
-
-
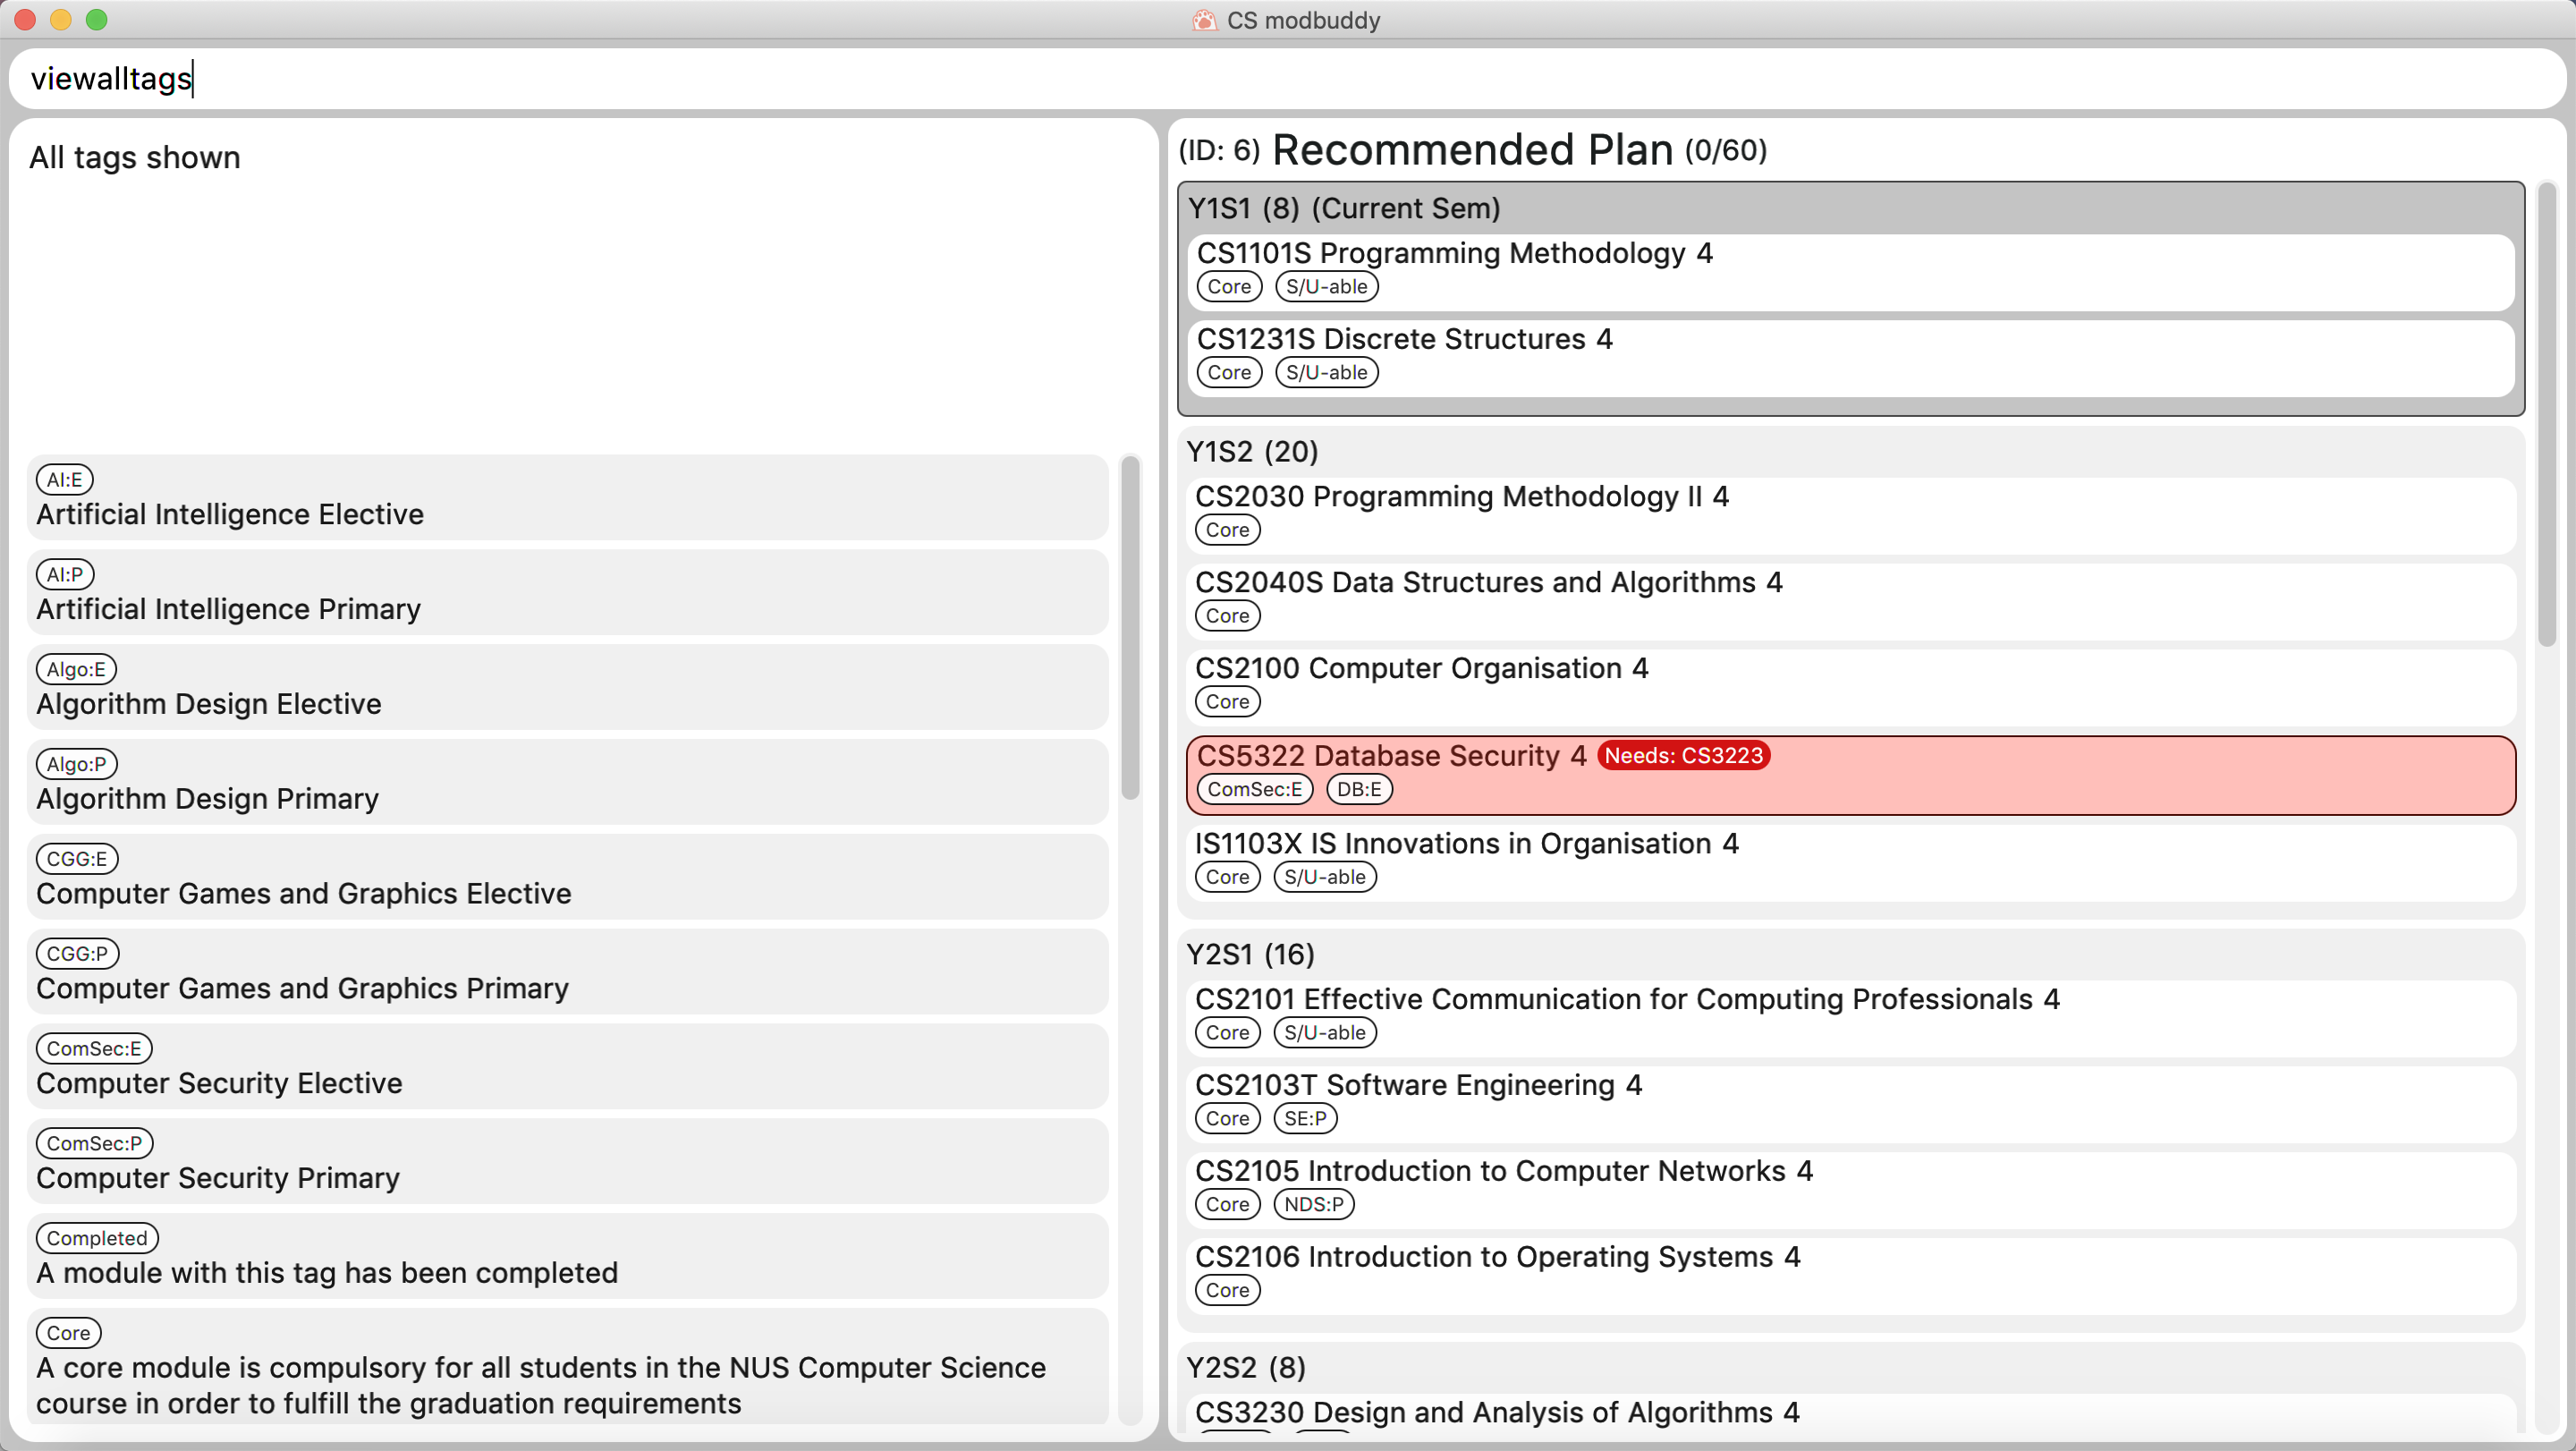
Contributions to the User Guide
Given below are sections I contributed to the User Guide. They showcase my ability to write documentation targeting end-users. |
Module
Assigning a module to a given semester: addmod
Assigns the specified module to a given semester of the current study plan.
| Only CS modules may be added to the study plan. Additional modules taken outside of the CS curriculum, such as other University Level Requirements (ULRs) or Unrestricted Electives (UEs), are outside the scope of our application. |
Format: addmod SEMESTER MODULE …
Examples:
-
addmod y1s1 CS1101s -
addmod y2s2 CS3244 CS3245 CS3233
Removing a module from a given semester: removemod
Removes the specified module to a given semester of the current study plan.
Format: removemod SEMESTER MODULE …
Examples:
-
removemod y1s1 CS1101S -
removemod y2s2 CS3244
Undo-ing the previous command: undo
Undo the previous command. The state of the application will revert back to that before the previous command. This command cannot undo itself.
The commands that make changes to the storage file, such as commit, cannot be undone.
|
Format: undo
Redo-ing the previous undone command: redo
Redo the previous undone command. The state of the application will revert back to that before the undo. This command cannot redo itself.
Format: redo
Contributions to the Developer Guide
Given below are sections I contributed to the Developer Guide. They showcase my ability to write technical documentation and the technical depth of my contributions to the project. |
Logic component

API :
Logic.java
-
Logicuses themodulePlannerParserclass to parse the user command. -
This results in a
Commandobject which is executed by theLogicManager. -
The command execution can affect the
Model(e.g. adding a module). -
The result of the command execution is encapsulated as a
CommandResultobject which is passed back to theUi. -
In addition, the
CommandResultobject can also instruct theUito perform certain actions, such as displaying information to the user or refreshing the Ui.
Undo/Redo feature
Current Implementation
The undo/redo mechanism is inpired by the undo/redo implementation in AddressBook 3 and is facilitated by VersionedModulePlanner.
It extends modulePlanner with an undo/redo history, stored internally as an historyStateList and currentStatePointer.
Additionally, it implements the following operations:
-
VersionedModulePlanner#commit()— Saves the current module planner state in its history. -
VersionedModulePlanner#undo()— Restores the previous module planner state from its history. -
VersionedModulePlanner#redo()— Restores a previously undone module planner state from its history.
These operations are exposed in the Model interface as Model#addToHistory(), Model#undo() and Model#redo() respectively.
| Currently, the undo-redo mechanism does not include/respond to changes to commands involving Commits - saving and removing changes to the storage files. |
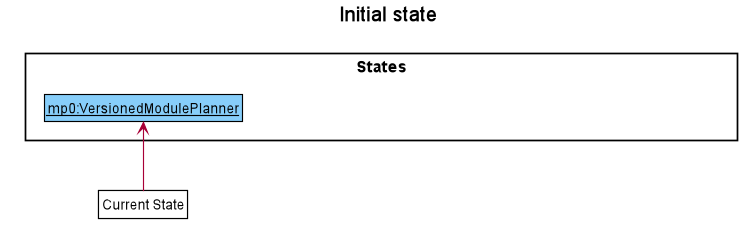
Given below is an example usage scenario and how the undo/redo mechanism behaves at each step.
Step 1. The user launches the application for the first time. The VersionedModulePlanner will be initialized with the initial module planner state, and the currentStatePointer pointing to that single module planner state.
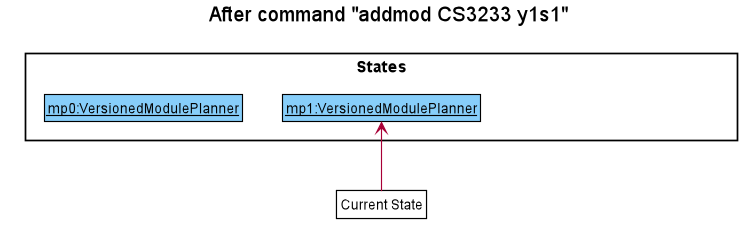
Step 2. The user executes addmod CS3233 y1s1 command to add the Module CS3233 module into Semester y1s1 in the active study plan. The addmod command calls Model#addToHistory(), causing the modified state of the module planner after the addmod CS3233 y1s1 command executes to be saved in the historyStateList, and the currentStatePointer is shifted to the newly inserted module planner state.
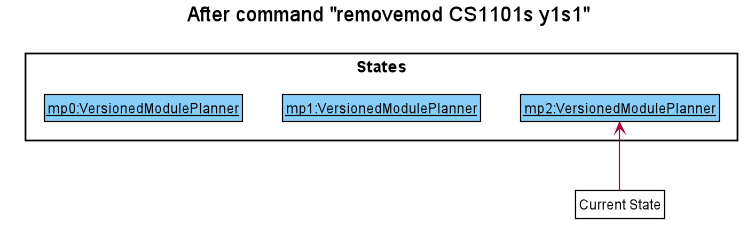
Step 3. The user executes removemod CS1101s y1s1 to remove the Module CS1101S module from Semester y1s1 in the active study plan. The remove command also calls Model#addToHistory(), causing another modified module planner state to be saved into the historyStateList.
If a command fails its execution, it will not call Model#addToHistory(), so the module planner state will not be saved into the historyStateList.
|
Step 4. The user now decides that removing the module was a mistake, and decides to undo that action by executing the undo command. The undo command will call Model#undo(), which will shift the currentStatePointer once to the left, pointing it to the previous module planner state, and restores the module planner to that state.
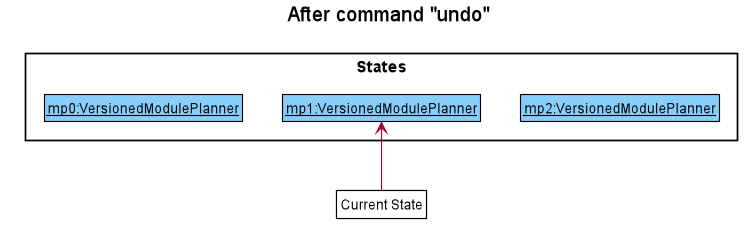
If the currentStatePointer is at index 0, pointing to the initial module planner state, then there are no previous module planner states to restore. The undo command uses Model#canUndo() to check if this is the case. If so, it will return an error to the user rather than attempting to perform the undo.
|
The following sequence diagram shows how the undo operation works:
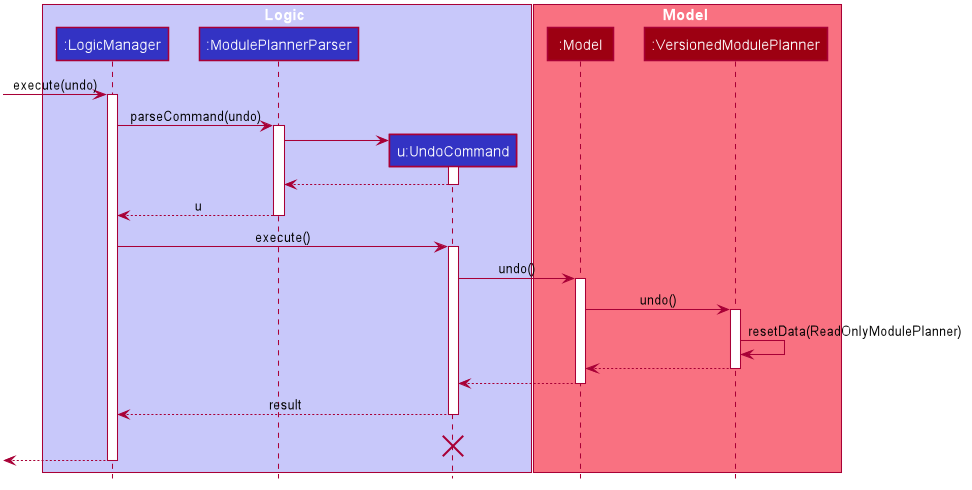
The lifeline for UndoCommand should end at the destroy marker (X) but due to a limitation of PlantUML, the lifeline reaches the end of diagram.
|
The redo command does the opposite — it calls Model#redo(), which shifts the currentStatePointer once to the right, pointing to the previously undone state, and restores the module planner to that state.
If the currentStatePointer is at index historyStateList.size() - 1, pointing to the latest module planner state, then there are no undone module planner states to restore. The redo command uses Model#canRedo() to check if this is the case. If so, it will return an error to the user rather than attempting to perform the redo.
|
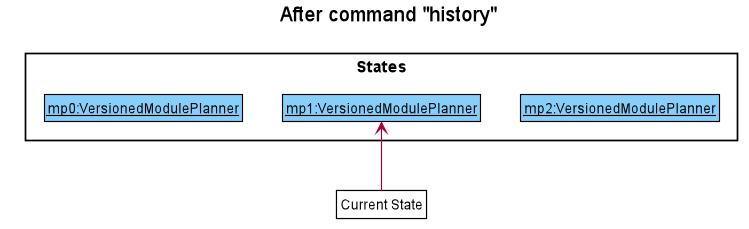
Step 5. The user then decides to execute the command history. Commands that do not modify the module planner, such as history, will usually not call Model#addToHistory(), Model#undo() or Model#redo(). Thus, the historyStateList remains unchanged.
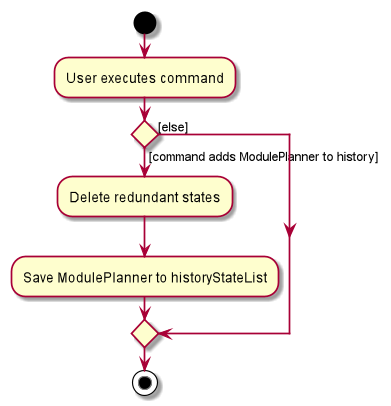
The following activity diagram summarizes what happens when a user executes a new command:
Design Considerations
Aspect: How undo & redo executes
-
Alternative 1 (current choice): Saves a copy of the entire module planner in the
historyStateList. It does this by performing a clone operation through the hierachy of classes of the ModulePlanner, from StudyPlan, Semester, Module down to Tag.-
Pros: Easier to implement.
-
Cons: May have performance issues in terms of memory usage. Need to take note of the implications of cloning all the objects.
-
-
Alternative 2: Implement redo/undo for every single command.
-
Pros: Will use less memory (e.g. for
removemod, just save the module being deleted). -
Cons: Tedious because there are a lot of commands and we must ensure that the implementation of each individual command are correct.
-
Parser
Current Implementation
The current parsing mechanism is facilitated by ArgumentTokenizer and ArgumentMultimap.
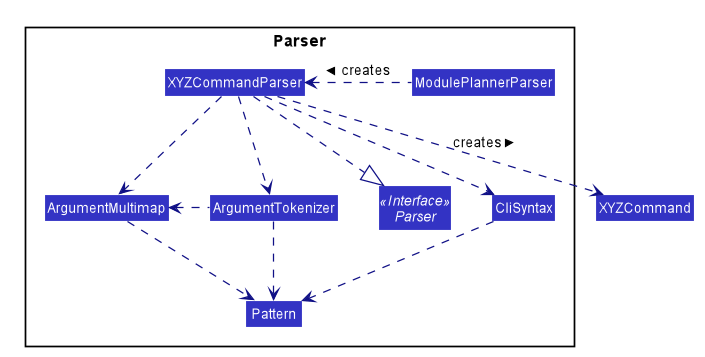
Given below is an example usage scenario and how the parsing mechanism behaves at each step.
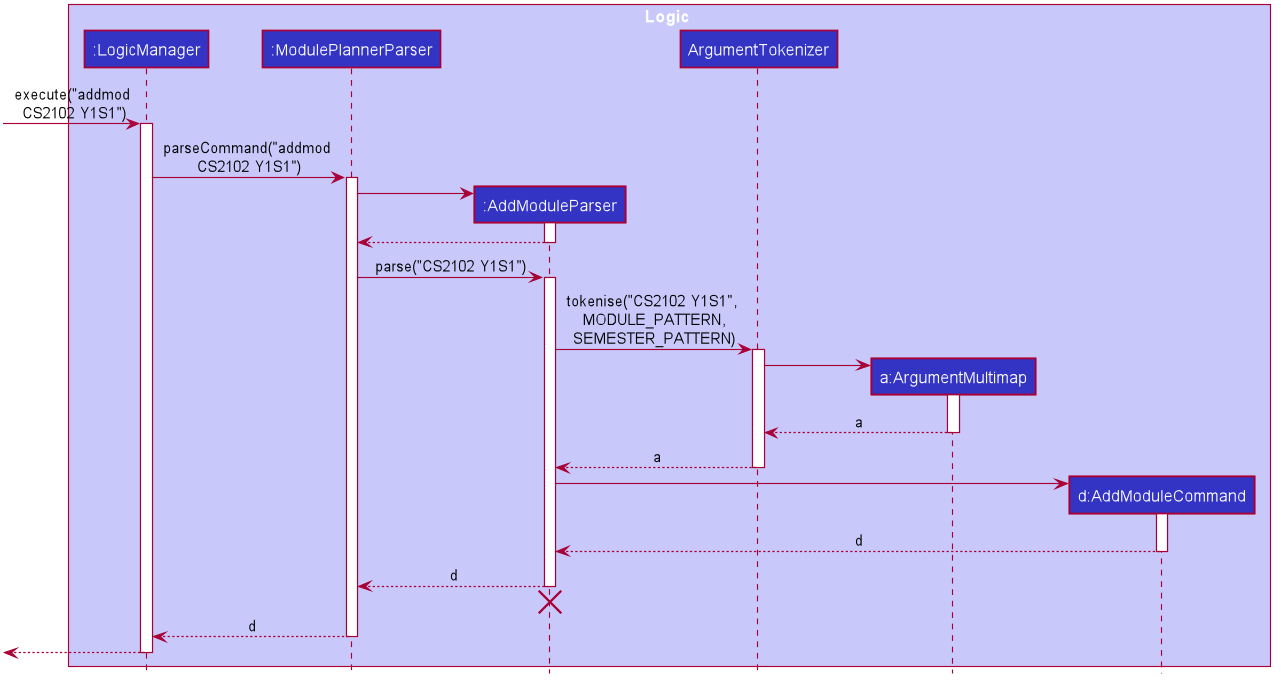
Step 1. The user enters the addmod MODULE_CODE SEMESTER. command to add a module with the moduel code MODULE_CODE to the
semester with the name SEMESTER. In this case, the command entered is addmod CS2102 Y1S1.
Step 2. The Ui component sends the command to the LogicManager to parse the command. The ModulePlannerParser detects the COMMAND_WORD of the command, addmod, and creates an instance of the AddModuleParser class.
Step 3. The AddModuleParser instance then calls ArgumentTokeniser static method, tokenise, with arguments ARG_STRING, MODULE_PATTERN and SEMESTER_PATTERN. These patterns are instances of Java Patterns class and are pre-defined in the CliSyntax class. They are passed into the tokenise method so that the ArgumentTokeniser knows to parse to find these patterns.
Step 4. The ArgumentTokeniser then creates an ArgumentMultiMap based on the specified patterns, which is then returned to the AddModuleParser.
Step 5. The ArgumentMultiMap is then used to obtain the arguments to create an instance of the AddModuleCommand class.
Design Considerations
Aspect: How parser is implemented
-
Alternative 1 (current choice): Use Java
Patternclass to detect argument types.-
Pros: User no longer has to type prefixes before each argument type to declare the parameter of the argument.
-
Cons: Difficult to implement because it requires a lot of corner case detection, and also does not consider the order of arguments being entered.
-
-
Alternative 2: Use prefixes (similar to that implemented in Address Book 3) so that user declares type of parameter before each argument in the command.
-
Pros: Easy to implement.
-
Cons: User has to type in prefixes, which will reduce ease and efficiency of application use.
-