Overview
CS ModBuddy is an module-planning application designed for primarily first-year computer science undergraduates in NUS. Users may create study plans where they can add and remove modules from various semesters, tag these modules to personalize their study plan, and check if they meet graduation requirements.
This application is written in Java, and morphed from AddressBook-3.
Summary of contributions
-
Major enhancement: added the description of modules
-
What it does: given a module code, users can retrieve a description of the entire module, including its focus areas, S/U-ability, prerequisites, and more. Users may also list all core or focus area modules that can be taken.
-
Justification: this feature allows users to easily refer to information on various modules, which facilitates module planning and helps them decide whether or not to include them in their study plans.
-
Highlights: it required the creation of a comprehensive JSON file detailing module requirements, prerequisites, and all other module-related information, which forms the backbone of all modules created in our application. (#61)
-
Credits: The information for computer science modules was sourced from NUSMods.
-
-
Major enhancement: added the checking of module prerequisites and study plan requirements
-
What it does: searches for and highlights modules whose prerequisites are not satisfied in the user’s study plan. It also checks the study plan for overall graduation requirements, such as focus area requirements, core module requirements, and total MC count.
-
Justification: this feature allows the user to create a legitimate study plan that satisfies the given requirements, so that the resulting study plan allows the student to graduate.
-
Highlights: to check for a module’s prerequisites, they need to be parsed into trees (involving AND or OR structures) that are checked against every time the user makes adjustments to their study plan.
-
Credits: The information on overall graduation requirements was sourced from the NUS Computing website.
-
-
Minor enhancements:
-
Added a command to clear all invalid modules in a study plan, whose prerequisites have not been met.
-
Added a command to view all valid modules that can be taken in a given semester. This helps the user to decide what modules he or she may take next.
-
-
Code contributed: [Functional and Test Code]
-
Other contributions:
-
Project management:
-
Took part in the release of
v1.3 -
Opened a consolidated bug tracker for issues discovered while testing (Issue #239)
-
-
Enhancements to existing features:
-
Made GUI displays for invalid modules, showing its module prerequisites. (Pull request #149)
-
Updated the GUI with a completed and total MC count for the entire study plan (Pull request #194)
-
Wrote additional tests for features related to module information and verification (Pull requests #154, #180, #195, #228, #299)
-
-
Documentation:
-
Community:
-
Contributions to the User Guide
Given below are sections I contributed to the User Guide. They showcase my ability to write documentation targeting end-users. |
Checking a study plan’s feasibility : check
Shows details about what graduation requirements are left to be fulfilled, such as MCs, core or focus area modules that remain to be taken.
| This command will not check for the minimum number of MCs to be taken per semester, as additional modules that students may take (such as UEs or ULRs) are outside the scope of our project. |
Format: check [AREA]
Examples
-
check mcs -
check core -
check focus -
check
Error messages
Displays a useful error message if the input is invalid. For example, it should highlight wrong commands, wrong numbers of arguments, or arguments in the wrong format.
Viewing modules that can be taken in a given semester : validmods
Shows all the modules that can be taken in a given semester, based only on whether its prerequisites have been met.
| This semester need not necessarily exist in the module planner for you to view its valid modules. Moreover, certain modules such as the internship and dissertation may show up in early semesters, because their prerequisites are not expressible in terms of prerequisite modules. |
Format: validmods SEMESTER
Example:
-
validmods y2s1
Clear all currently invalid modules : clearinvalidmods
Clears all modules that are currently invalid, whose prerequisites have not been met in previous semesters.
This may cause other modules in future semesters to be invalidated as well.
Format: clearinvalidmods
Viewing description of a module: description
Shows the description of a particular module, including its prerequisites.
Only computer-science related modules will have these descriptions, and not general modules nor electives.
Format: description MODULE_CODE
Example:
-
description CS2103T
Showing all focus area primary modules: showfocus
Shows all focus area primary modules.
Format: showfocus
Contributions to the Developer Guide
Given below are sections I contributed to the Developer Guide. They showcase my ability to write technical documentation and the technical depth of my contributions to the project. |
Architecture

The Architecture Diagram given above explains the high-level design of the App. Given below is a quick overview of each component.
-
At app launch: Initializes the components in the correct sequence, and connects them up with each other.
-
At shut down: Shuts down the components and invokes cleanup method where necessary.
Commons represents a collection of classes used by multiple other components.
The following class plays an important role at the architecture level:
-
LogsCenter: Used by many classes to write log messages to the App’s log file.
The rest of the App consists of four components.
Each of the four components
-
Defines its API in an
interfacewith the same name as the Component. -
Exposes its functionality using a
{Component Name}Managerclass.
For example, the Logic component (see the class diagram given below) defines its API in the Logic.java interface and exposes its functionality using the LogicManager.java class.

How the architecture components interact with each other
The Sequence Diagram below shows how the components interact with each other for the scenario where the user issues
the command addmod y1s1 CS3244.

addmod y1s1 CS3244 commandThe sections below give more details of each component.
Module Information and Verification
Implementation
The reading of modules information is facilitated by ModulesInfo, which contains a list of ModuleInfo objects.
All information regarding our modules are initially stored in json format, within the file
src/main/resources/modules_cs.json.
Information in a ModuleInfo object includes:
-
code: Module code -
name: Module name -
mc: MC count -
su: Whether the module can be S/U-ed -
isCore: Whether the module is a core module -
focusPrimaries: List of focus area primaries -
focusElectives: List of focus area electives -
description: Module description -
prereqTree: Module’s prerequisite tree
Upon starting the main app, the data is read once into a ModulesInfo object, which contains a list
of ModuleInfo objects — it is then passed into our model, whereby our ModelManager holds it as a reference.
Upon creating a study plan, the module planner will create the relevant Module objects, whose information
matches their corresponding ModulesInfo objects. Each Module object should correspond to exactly one
ModuleInfo object (with the same module code).
Prerequisite checking
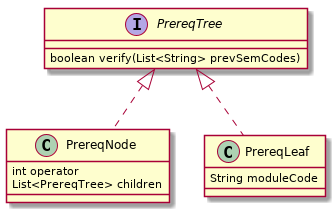
To facilitate prerequisite checking, we have an interface PrereqTree, implemented by two classes
PrereqLeaf and PrereqNode.

Each PrereqLeaf represents a module prerequisite. Each PrereqNode has an AND or OR operator — for instance,
(CS2030 AND CS2040) would be represented by a PrereqNode with the operator AND, with two PrereqLeaf leaves:
one for CS2030, and one for CS2040.
Importantly, PrereqTree contains the method verify(List<String> prevSemCodes). Given a list of strings of module
codes taken in previous semesters, the prerequisite tree will return a boolean value, signalling if the module already
has its prerequisites satisfied.
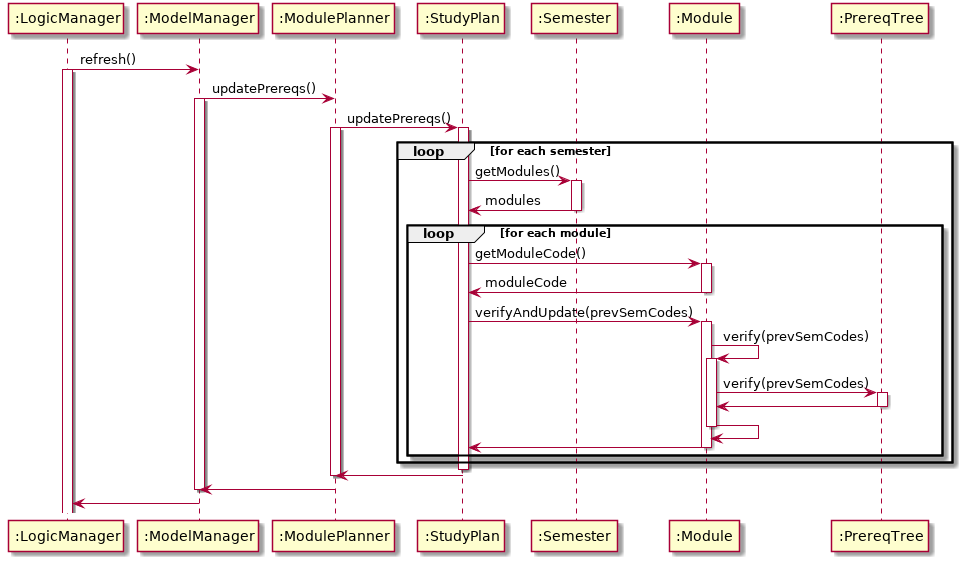
Upon executing any command, the method refresh() will be called in the module manager, which verifies the prerequisites
of every Module and updates them in the GUI. Modules that do not have their prerequisites fulfilled will be shown
with a red tag beside it.

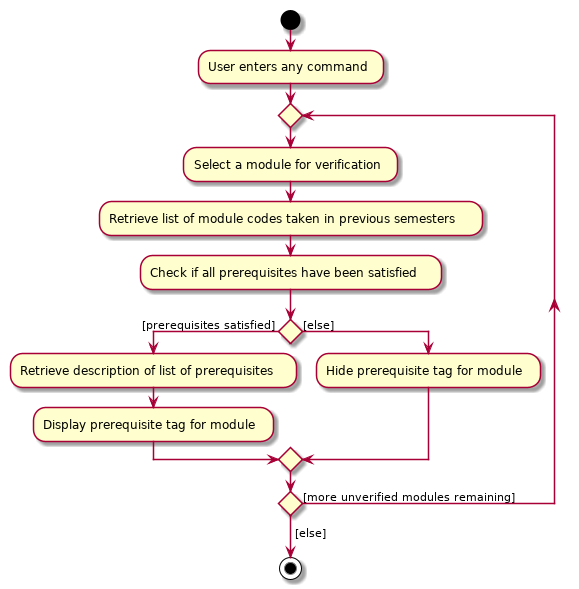
The following activity diagram shows how the verification works for each module:

Design Considerations
Aspect: Relationship between a module and its module information
-
Alternative 1 (current choice): All
ModuleInfoobjects are only created once upon initialising the application, one for each CS module. When creating aModuleobject, it then finds the correspondingModuleInfoobject (with the same module code), then derives its attributes (e.g. name, MC count, tags) from it.-
Pros: The json file is only read once to create all
ModuleInfoobjects at once, which is more efficient. -
Cons: It could lead to greater code complexity, as the model manager needs to keep track of not only
Moduleobjects, but alsoModuleInfoobjects.
-
-
Alternative 2: Whenever a new
Moduleobject is created, it re-reads the json file to read in the necessary information.-
Pros: The module manager does not need to persistently hold on to the same list of
ModuleInfoobjects. -
Cons: It performs the same reading action multiple times, which could lead to slowdowns.
-
Use case: UC05 - Correct modules without a prerequisite
MSS
-
ModBuddy highlights a module in red because its prerequisites have not been fulfilled.
-
Student checks the prerequisites of the module.
-
ModBuddy displays all a module’s prerequisites that have yet to be fulfilled in previous semesters.
-
Student adds the unfulfilled module prerequisite to a selected previous semester.
-
ModBuddy un-highlights the module now that its prerequisites have been fulfilled.
Use case ends.
Extensions
-
1a. Student decides not to take the module.
-
1a1. Student removes the module from the semester.
Use case ends.
-
-
3a. Student checks if the module to be added is valid in a selected previous semester.
Use case resumes from step 4.
