Overview
CS ModBuddy is a desktop application that can be used for module planning by NUS undergraduates taking a Computer Science major. The user interacts with it using a CLI and it has a GUI created with JavaFX. It is written in Java and has about 85kLoC.
Summary of contributions
-
Major enhancement: Added the ability to manage and classify modules and study plans with tag-related commands
-
What it does:
-
For modules: Users can add, delete, rename and view tags, as well as view modules that are filtered according to their tags
-
For study plans: Users can add priority tags to study plans to indicate the relative importance of different study plans and view a list of study plans that are sorted according to their priorities
-
-
Justification: This feature improves the product significantly because module planning is considerably complex given the variety of modules that one can choose from. Hence, the application should provide a convenient way to manage and categorize them for easier viewing and neater planning.
-
Highlights: This enhancement required an in-depth analysis of design alternatives. Instead of adopting the previous implementation of creating a new tag object every time a change is made, this implementation modifies the existing tag directly. In addition, references were used to allow various entities to store the same tag. This not only promotes consistency when a change to a tag is made, but also the efficiency of a command as only one object has to be modified. Polymorphism was also utilized to support the storage of different types of tags (e.g. default tags, user-created tags and priority tags)
-
-
Minor enhancement: Added a command that allows users to find the semester in which a module is current located within the active study plan.
-
Code contributed: [Functional and Test code]
-
Other contributions:
-
Project management:
-
In charge of managing documentations and deadlines and deliverables
-
Managed some milestones (assigned issues to members and assigned issue labels, set milestone deadlines and closed milestone)
-
-
Enhancements to existing features:
-
Did basic refactoring of AddressBook, Person and other related classes (e.g. Name, Address, etc.) in AB3 to Module Planner and Study Plan classes (Pull request #111)
-
Added result view panel in GUI to show different result types (e.g. tag cards, module cards) depending on executed command (Pull request #184)
-
Modified Tag class to an interface that supports different types of tags and changed existing tests (Pull request #104, #221, #145)
-
Wrote tests for tagging related commands and Tag classes, with 100% and 95% of lines covered respectively.
-
-
Documentation:
-
Community:
-
Helped to fix minor bugs in teammates’ codes
-
-
Contributions to the User Guide
Given below are sections I contributed to the User Guide. They showcase my ability to write documentation targeting end-users. |
Finding modules using module code: findmod
Shows the semester that the specified module is located at.
Format: findmod MODULE_CODE
Examples:
-
findmod cs1101s
Tagging
| All tag names must be single words and cannot be more than 25 characters long. |
Viewing default tags : viewdefaulttags
Shows all default tag types.
Format: viewdefaulttags
List of default tags:
-
Completed: Completed modules are modules that are in any semester before the current semester. -
Core: Core modules are Computer Science Foundation modules that count towards Programme Requirements. -
S/U-able: S/U-able modules are modules that permit the Satisfactory/Unsatisfactory option. -
UE [coming in v2.0]: UE modules are Unrestricted Elective modules. -
ULR [coming in v2.0]: ULR modules are modules that count towards University Level Requirements. -
FOCUS_AREA_NAME:P: P modules are modules that count towards Focus Area Primaries for FOCUS_AREA_NAME. -
FOCUS_AREA_NAME:E: E modules are modules that count towards Focus Area Electives for FOCUS_AREA_NAME.
Tagging modules : addtag
Attaches a tag to a module.
Format: addtag MODULE_CODE TAG_NAME
If a tag with the given TAG_NAME does not exist, a new tag will automatically be created and tagged to the specified module.
|
Example:
-
addtag cs3230 exchange
Attaches the tag with name exchange to CS3230.
Deleting tags: deletetag
Deletes a tag completely and removes it from any module that it is attached to.
Format: deletetag TAG_NAME
| Only user-created tags can be deleted, i.e. default tag cannot be deleted. |
Example:
-
deletetag exchange
Removing a tag from a module: removetag
Removes a tag from a module.
Format: removetag MODULE_CODE TAG_NAME
Example:
-
removetag cs3230 exchange
Viewing all tags : viewalltags
Shows all tag types.
Format: viewalltags
Renaming an existing tag : renametag
Renames a tag.
Format: renametag ORIGINAL_TAG_NAME NEW_TAG_NAME
Only user-created tags can be renamed, i.e. default tag cannot be renamed. Also, renametag currently does not support
renaming tags to names that differ only in letter case, i.e. if the new tag name is the same as the old tag name, it will not be renamed.
This will be done in v2.0.
|
Example:
-
renametag exchange sep
Renames the tag name from exchange to sep.
Viewing modules with specific tags : viewtagged
Shows all modules attached to all the specified tags.
Format: viewtagged TAG_NAME ...
Examples:
-
viewtagged completed
Shows all modules that are tagged as completed. -
viewtagged core completed
Shows all modules that are tagged as core and completed.
Viewing tags for a specific module : viewtags
Shows all tags attached to the specified module.
Format: viewtags MODULE_CODE
Examples:
-
viewtags cs2030
Removing all tags from the study plan : removealltags
Removes all user-created tags in the entire study plan.
Format: removealltags
Adding priority tags to a study plan : setpriority
Attaches a priority tag to the study plan.
Format: setpriority PRIORITY_LEVEL STUDY_PLAN_ID
Examples:
-
setpriority high 1 -
setpriority low 3
Removing priority tags from study plan: removepriority
Removes the priority tag from the study plan.
Format: removepriority STUDY_PLAN_ID
Examples
-
removepriority 1 -
removepriority 3
Listing study plans by priority: listbypriority
Lists all study plans in the order of their priorities.
Format: listbypriority
Setting focus area tags to study plans: [coming in v2.0]
A tag with the declared focus area will automatically appear when the user declares his/her focus area.
Get module codes from keywords: [coming in v2.0]
Shows all module codes of modules with names containing the specified keywords.
Tagging modules across all study plans: [coming in v2.0]
Attaches a specified tag to a module across all study plans. For example, a tag difficult can be attached to a
given module across all study plans instead of tagging them individually in every study plan.
Contributions to the Developer Guide
Given below are sections I contributed to the Developer Guide. They showcase my ability to write technical documentation and the technical depth of my contributions to the project. |
Contributed Model (omitted).
Tagging Feature
Implementation
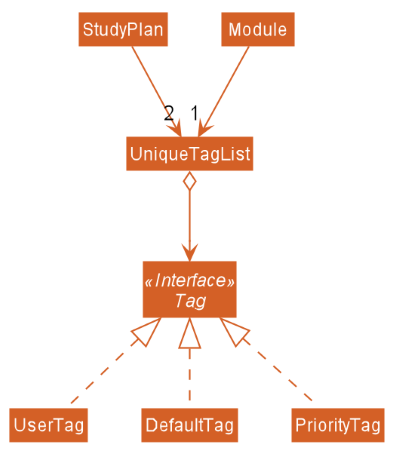
The tagging mechanism is facilitated by UserTag, DefaultTag, PriorityTag and UniqueTagList.
UserTag, DefaultTag and PriorityTag all implement the Tag interface.
Specifically, UserTag and DefaultTag are attached to modules and PriorityTag is attached to study plans.
Module Tags
UserTag represents user-created tags while the DefaultTag
represents default tags of one of the types in DefaultTagType. The key difference between UserTag and DefaultTag
is that the first is user-modifiable while the second is not and is essentially immutable. The operation
Tag#isDefault() is implemented to identify a Tag as a DefaultTag.
Study Plan Tags
PriorityTag represents a priority tag of one of the types in PriorityTagType. The user can attach a PriorityTag to a study plan to indicate its priority level.
The operation Tag#isPriority() is implemented to identify a Tag as a PriorityTag.
UniqueTagList
Each Tag is stored in a UniqueTagList, which implements Iterable<Tag> and is stored internally in Module and
StudyPlan. It represents a list of tags that can be of type UserTag, DefaultTag or PriorityTag and enforces the
uniqueness between them. Each StudyPlan has two unique tag lists, one for its PriorityTag and another for all of its modules' tags. The purpose
of storing the PriorityTag in a UniqueTagList instead of as independent attribute is to allow for further extensions
to study plan tagging, i.e. allowing study plans to have other kinds of tags.
UniqueTagList implements the following operations:
-
UniqueTagList#addTag(Tag toAdd)— Adds the givenTagto the list. -
UniqueTagList#removeTag(Tag toRemove)— Removes the givenTagfrom the list. -
UniqueTagList#containsTagWithName(String tagName)— Checks if the list contains aTagwith the giventagName. -
UniqueTagList#getTag(String tagName)— Returns theTagwith the giventagName.
There are many operations that can be done in relation to tagging modules. Some examples are adding, deleting,
and renaming tags. Given below is an example usage scenario of the UniqueTagList#addTag(Tag toAdd) operation and how the module tagging
mechanism behaves at each step.
Step 1. The user executes the addtag MODULE_CODE TAG_NAME command to add a tag with the name TAG_NAME to the
module with the module code MODULE_CODE. A toAdd variable of type Tag and a boolean value newTagCreated is
maintained during the execution of the command to represent the tag that is to be added and whether or not a new tag
has been created respectively. The addtag command calls Model#activeSpContainsTag(String tagName) to check if the
active study plan contains a tag with the given tagName. This method accesses the active study plan in the module
planner and checks if such a tag exists in its UniqueTagList. There are two possible scenarios that are described
in steps 2 and 3.
Step 2. If such a tag does not exist, a new UserTag is created and is assigned to toAdd.

Step 3. If such a tag exists, Model#getTagFromActiveSp(String tagName) is called. The Tag in the UniqueTagList
of the active study plan is returned and assigned to toAdd. Tag#isDefault() is called to check if the returned Tag
is a DefaultTag. If so, a CommandException is thrown as default tags cannot be added by users.
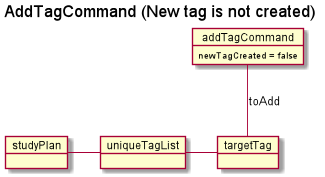
We only have to handle the case of adding default tags in this step and not in the previous step as default tags are
already initialised into the study plan and hence Model#activeSpContainsTag(String tagName) will always return true
if the given name is a default tag name.
|
Step 4. Model#addTagToActiveSp(UserTag toAdd, String moduleCode) is called to add toAdd to the module with the
given module code. This method accesses the module with the given moduleCode, which will call Module#addTag(Tag tag)
to add toAdd to its UniqueTagList. In the case that toAdd already exists in the UniqueTagList, it will not be
added, and the method will return false. (Step 5)
| The above scenario should not occur if a new tag had been created as described in Step 2. |
Otherwise, the toAdd will be added and the method will return true. (Step 6)
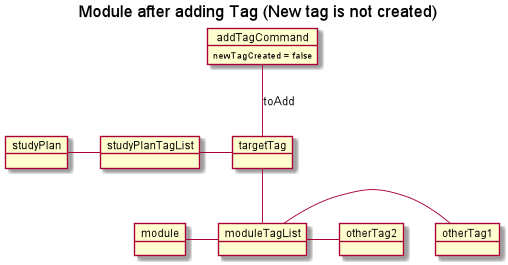
Step 5. If the tag had not been added, it would indicate that an essentially identical tag had already been attached to
the target module. Hence, a CommandException will be thrown.
Tag has a method Tag#isSameTag to identify essentially identical tags by comparing the tag names for UserTag
(this is case-insensitive) and the DefaultTagType for DefaultTag.
|
Step 6: If the tag had been added, a CommandResult with a success message is returned.
The following sequence diagram and activity diagram show how the addtag command works:
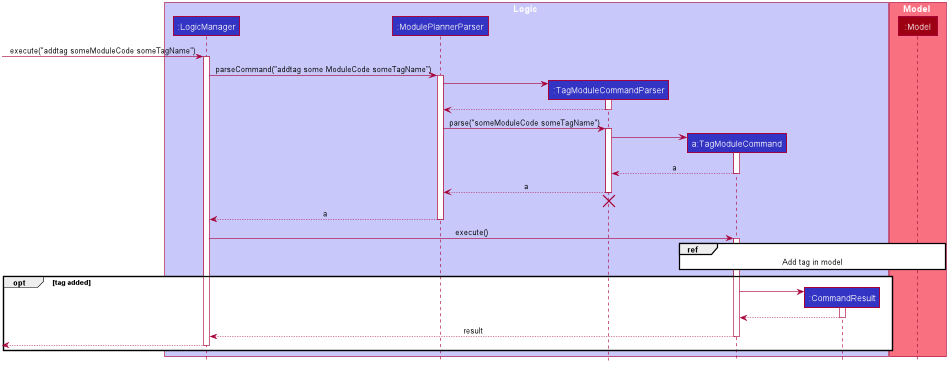
addtag command execution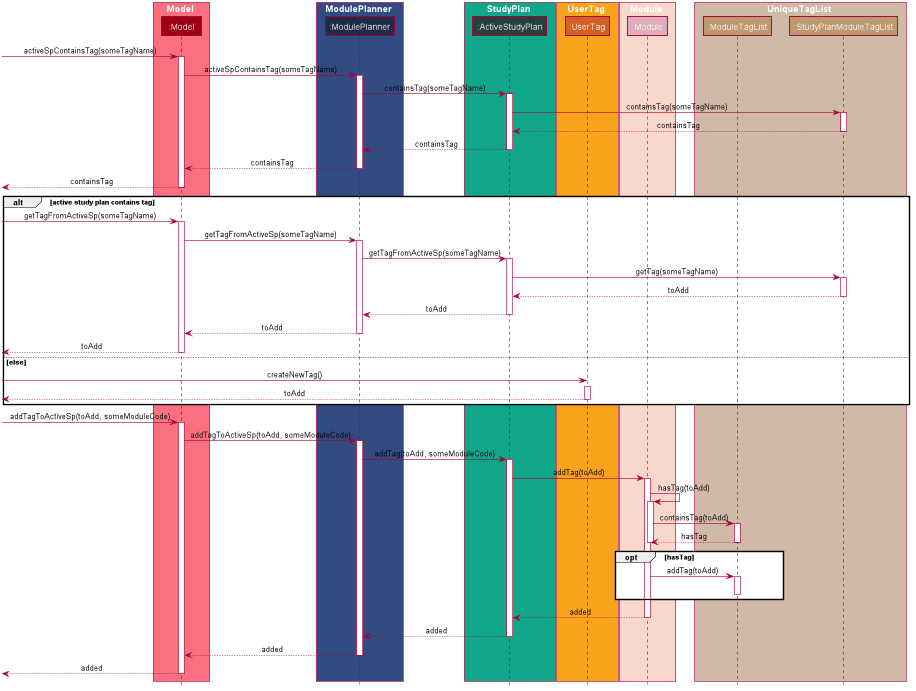
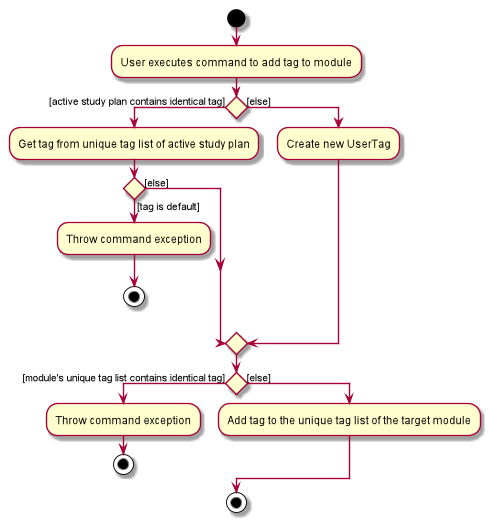
| The command exceptions in the above activity diagram should actually point to a single stop at the end. There are multiple stops in the above diagram as PlantUML does not support having a single stop and [] for branch labels in one syntax. |
Design Considerations
Aspect: How tags are assigned to modules
-
Alternative 1 (current choice): A tag with a given name is only created once. Adding a tag to a module simply creates a reference from the module to the existing tag.
-
Pros: Reduces memory usage, promotes consistency and makes duplication checking easier (simply check the
UniqueTagListof theStudyPlaninstead of checking the list in everyModule). -
Cons: More difficult to implement and requires searching and reassignment of pointers every time the command is executed.
-
-
Alternative 2: A new tag is created every time a tag is added even if there is already an existing tag with the same name.
-
Pros: Easier to implement as no searching of previous tags need to be done.
-
Cons: Increases memory usage, ensuring consistency and duplication checking might be more difficult (have to check the
UniqueTagListof everyModuleinstead of just the one in theStudyPlan.
-
Use case: UC04 - Tag a module
MSS
-
Student requests to tag a module
-
ModBuddy requests student to enter a tag name.
-
ModBuddy displays changes to study plan.
Use case ends.
Extensions
-
1a. ModBuddy detects that the module entered does not exist.
-
1a1. ModBuddy prompts Student to enter a correct module code
-
1a2. User enters new module.
Steps 1a1-1a2 are repeated until the data entered are correct.
Use case resumes from step 3.
-
-
2a. ModBuddy detects that the module already has the tag.
-
2a1. ModBuddy does not add a new tag.
Use case ends.
-
